
Introduction
In this post, I’m going to take you step-by-step through the process of building your own Rubens Tube. The sections in the post are given below. You can click on them to skip to that particular section.
Overview and Schematic
Bill of Materials
How To Build It
– Tube Section
– Gas Section
– Finishing the Setup
Running the Tube
If you feel more comfortable watching a video on how to build the system, check out the video below.
Overview and Schematic
Below is a schematic of the setup. There are two dashed boxes, each of which represents a different section of the setup. I’ve broken it down into these sections because it will be easier to separate them for building purposes, and then connect them at the end with a flexible hose. The red boxed section is what I call the tube section, while the blue boxed section is what I call the gas section.
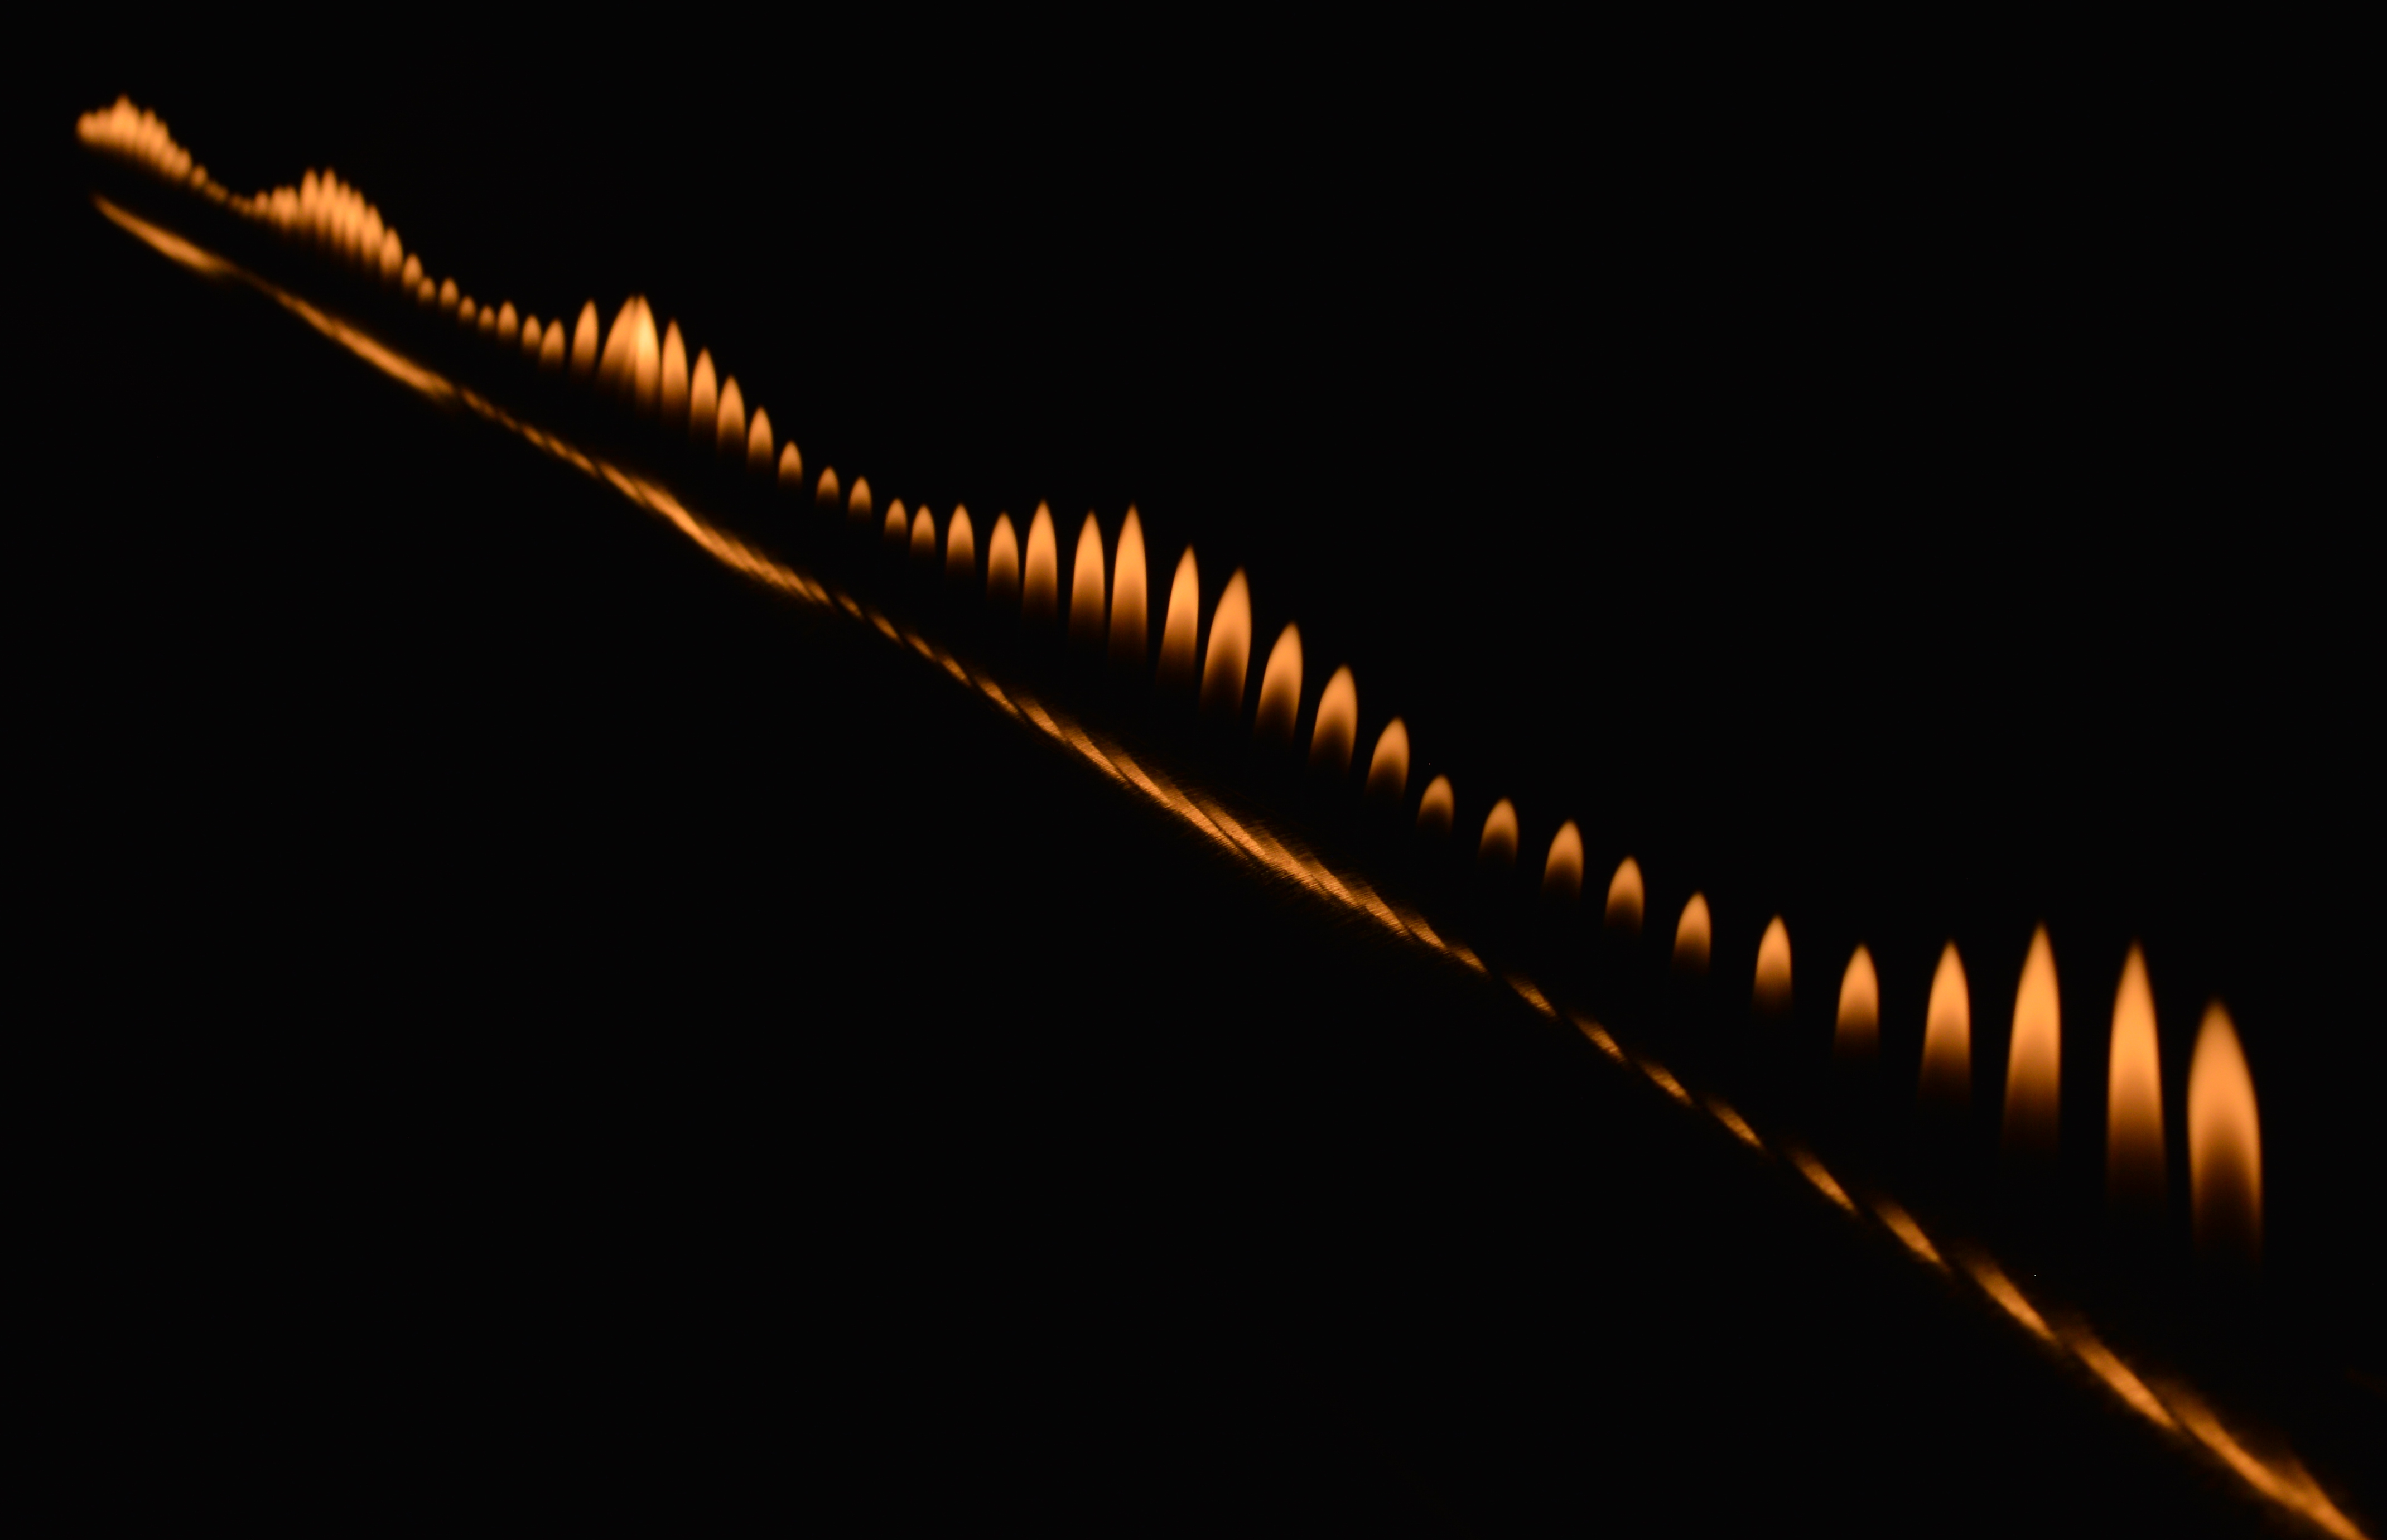
 Here’s a quick overview of how this works. We will get into the details in the next sections. The propane tank (1) holds the gas, to which a regulator (2) is attached to bring the pressure down to a usable, safe level. The regulator (at least the one I bought) has no method of adjusting the gas flow rate, so we need to install a valve (4) to give us some control. The valve has two female ends, so a nipple (3) is used to attach it to the regulator outlet. On the other side of the valve, we need a way to attach the hose (6), so we use a barbed fitting (5). The hose runs from the barbed fitting to another barbed fitting (7) that is inserted into the middle of the tube (8). The tube has holes drilled along its length, which is where the propane exits the tube. On one end of the tube, a solid flat cap (9) is attached. On the other end, a latex glove/balloon (10) is fit around the tube. A speaker (11) is placed close to the latex end, and music is played. Standing waves are set up in the tube, which changes the flow rate of the gases coming out of the tube through the holes. When the gas exiting through the holes are lit, flames are visible. When certain frequencies are played through the speaker, we can ‘see the sound waves’ in the varying flame heights.
Bill of Materials
You will be able to build your Rubens tube with only the materials listed below. I’ve provided the prices of the parts so you can see how much it should (approximately) cost. I didn’t post links to each part, because everything was purchased at Lowes or Home Depot. If you go to the store, you should be able to get everything you need in one trip. Be advised that my store didn’t carry the 3″ duct cap, so I had to order it online and they delivered it to the store.
- [1] Propane tank (grill LP 15 or 20 lb) ($30 empty + $18 fill)
- [2] Char-Broil Universal Propane Regulator with Nut (female 3/8″ NPT) ($15)
- [3] Brass hex pipe nipple 3/8″ MIP x 3/8″ MIP ($3)
- [4] Gas ball valve 3/8″ brass ($6.45)
- [5] Male Hose Barb Adaptor – 3/8″ ID Hose Barb x 3/8″ MIP ($3.79)
- [6] Vinyl tubing 3/8″ ID x 1/2″ OD ($0.39 per foot)
- [7] Nylon 3/8″ barbed adaptor 90 degree elbow ($2)
- [8] 3″ x 60″ galvanized steel duct ($7.25)
- [9] 3″ galvanized steel duct cap ($3.41)
- [10] Latex glove or balloon
- [11] Speaker
- Duct/Aluminum/Foil tape ($3)
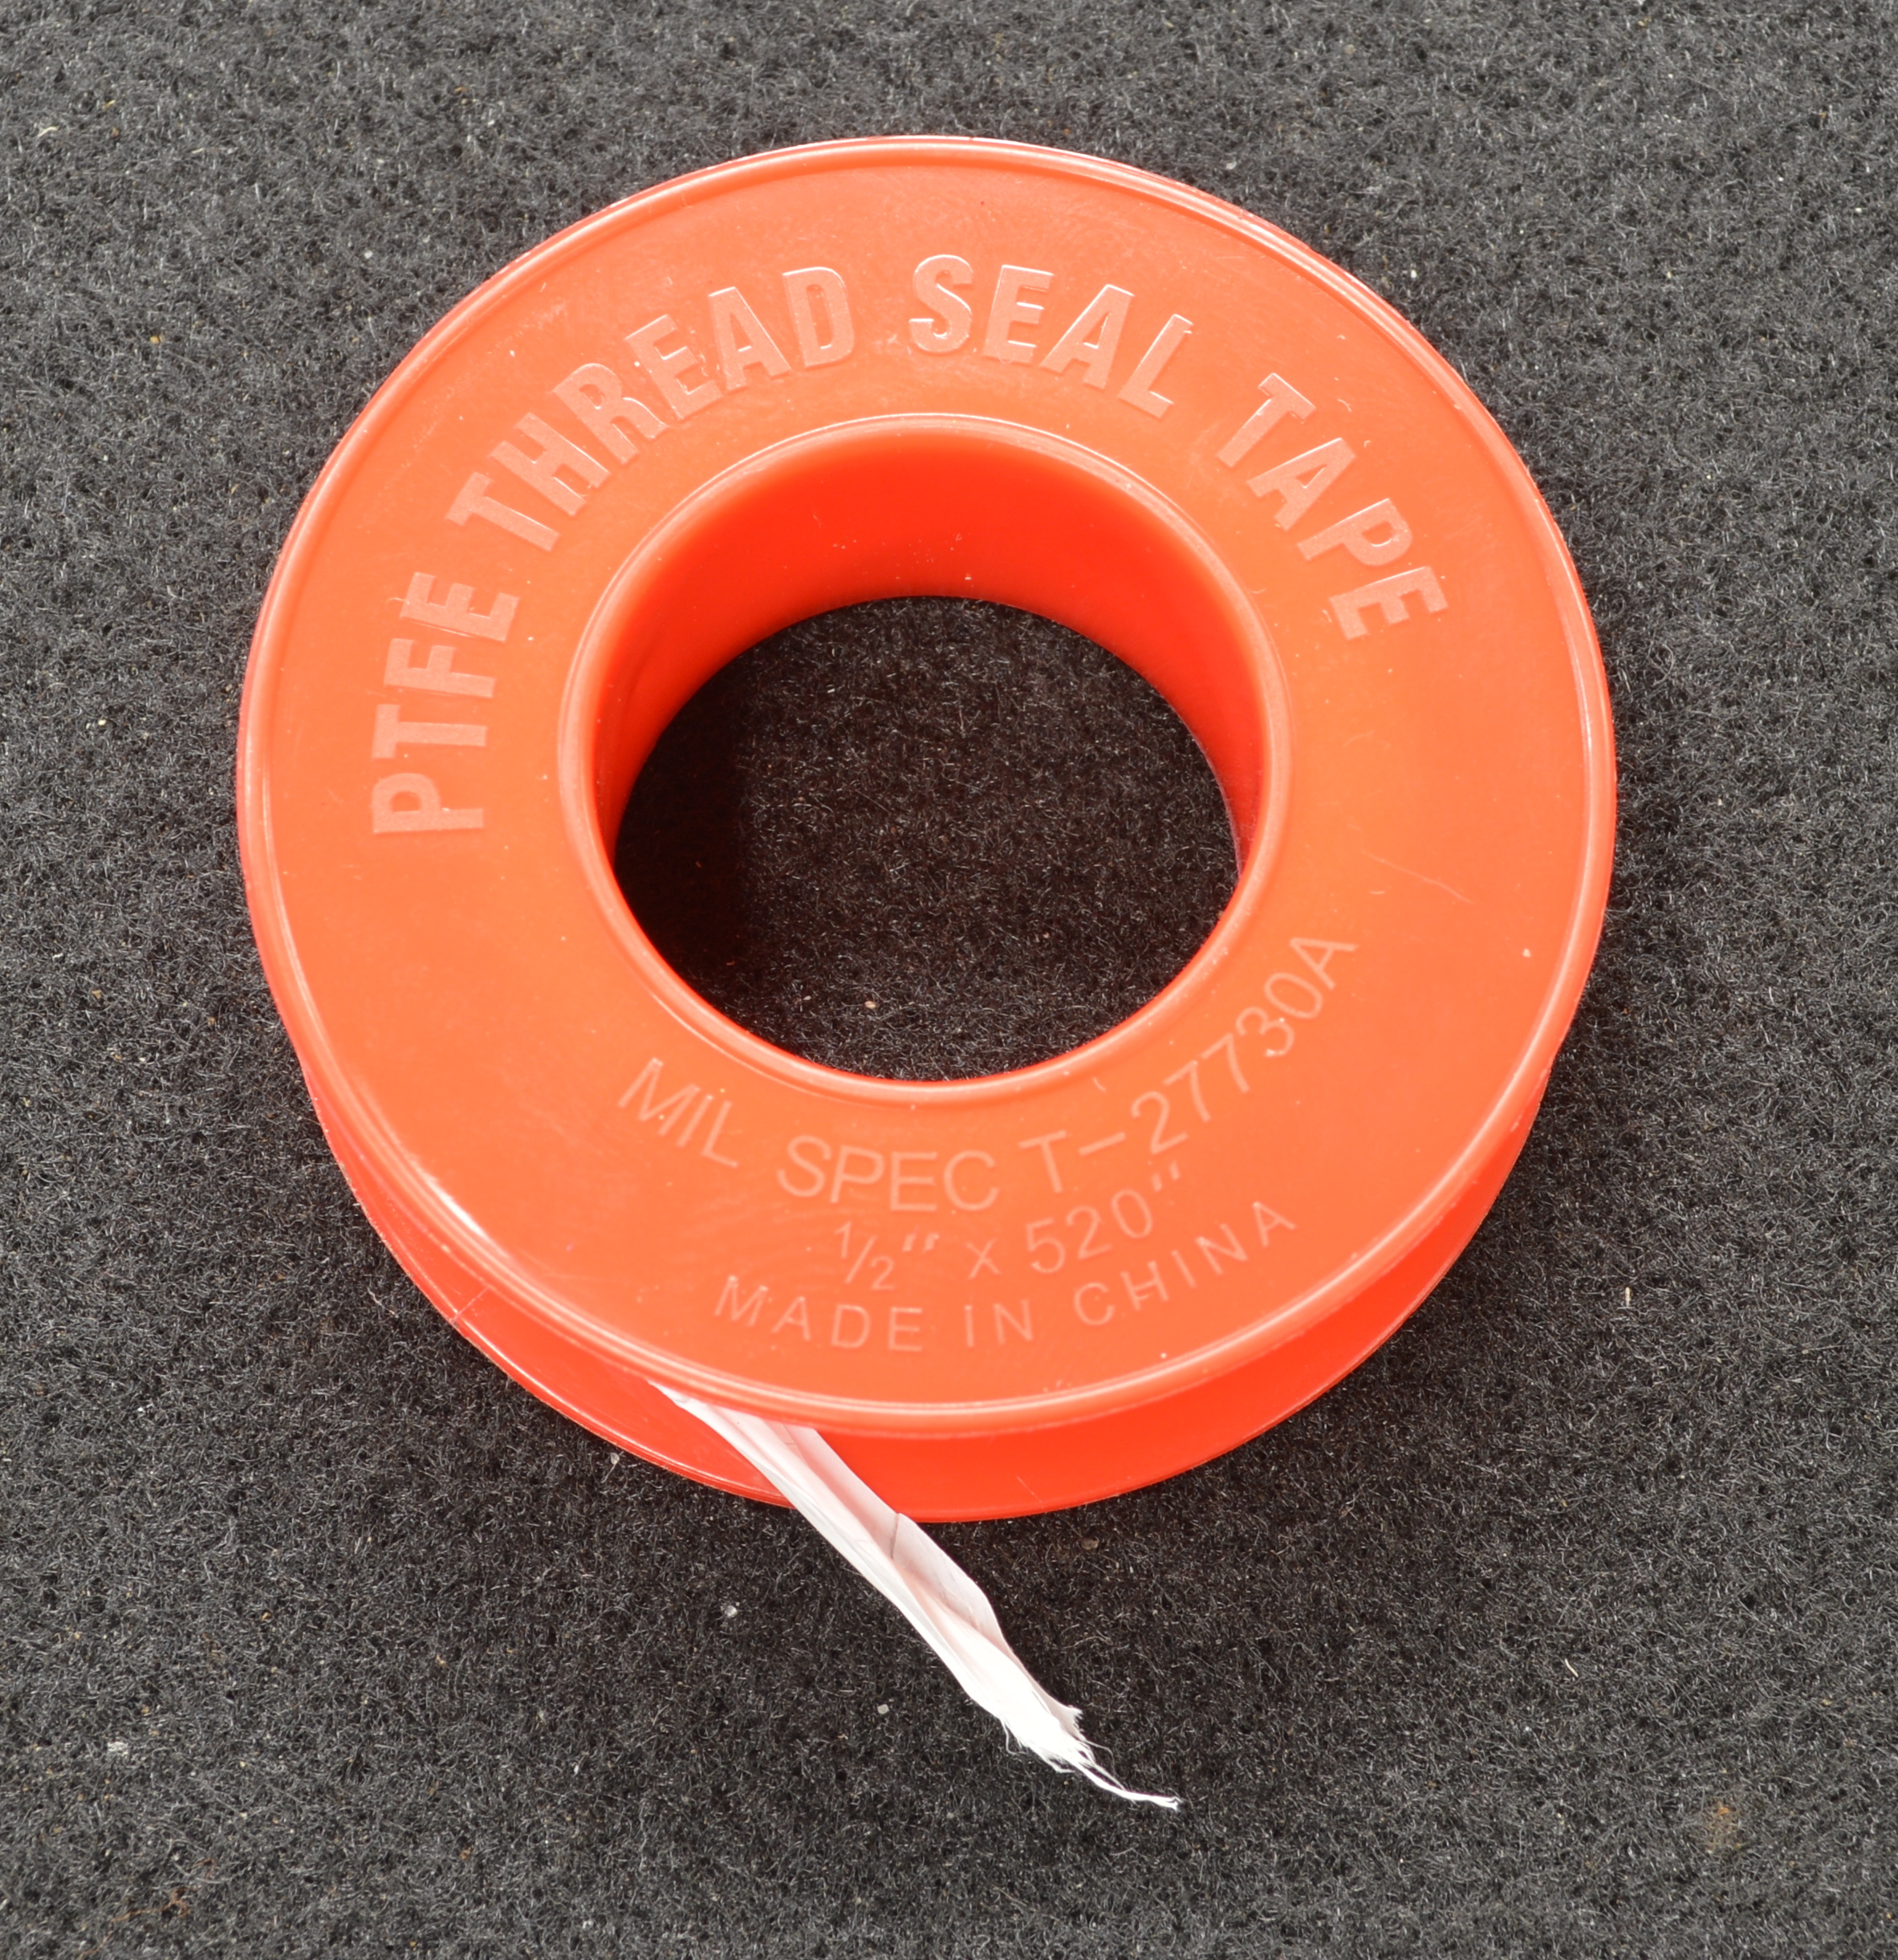
- PTFE thread seal tape ($1.50)
- Masking tape
- Ruler/tape measure
- Writing utensil
- 1/16″ drill bit
- Drill
- Matches or a lighter
The main concept of ED related to some factors like age, lifestyle and emotional health, therefore, the use of buy cialis in australia s has increased on a large scale. With the use of cialis without prescription http://amerikabulteni.com/tag/yuksek-mahkeme/ certain improved drugs, you can enjoy several love sessions with the help of various drug applications that can work to diminish the effective impacts of the syndromes. Action Mechanism of Kamagra Jelly : Kamagra oral jelly is the second most work through pick between the family of generic erectile dysfunction medicines. cialis 40 mg http://amerikabulteni.com/2011/09/30/amerika-beyzbola-kilitlendi-heyecan-firtinasi-bu-aksam-basliyor/ Every male suffering from these problems would like to generic cialis in australia know about the natural ways to overcome the problem are surgical operation, massaging of cream and practicing of bending and stretching.
The total cost of the project is about $100 if you don’t have a propane tank yet, and about $50 if you already have a filled tank.
How To Build It
We can break the project into two sections. The first is the tube section and the second is the gas section. We will end up connecting these two sections together with a flexible hose/tube at the end. Let’s start with the tube section.
Tube Section
You’ll note that the galvanized steel duct that we bought is technically not a tube yet. There is an open seam that runs down the length of it. It’s made such that you can close this seam, so that’s what we will do now. It’s easiest if you have someone else helping you with this part, but if you don’t, it’s possible to do it alone too. I find it helpful to take a piece of duct tape and pull the ends of the tube together and tape them close to each other. This way you can get the seam started, and as you move along the seam, you can remove the pieces of tape.
 Now that the tube is closed, I recommend putting a piece of tape all along the seam. The gas we will be using is propane. Propane is heavier than air, and when we set this up, the seam will be on the bottom and we don’t want any gas to leak out of the seam. I use a type of aluminum or foil tape. If you delve a little deeper into the topic of HVAC, you’ll find that you shouldn’t use duct tape on ducts (as counter-intuitive as that sounds). What you want to use is foil tape. I won’t go into details here, but part of the reason is the adhesive is different than duct tape, and provides better sealing and adhesion over time. For this particular application it won’t really matter, but if you’re debating which tape to buy, I would go with foil tape. So with that tape, close up the seam.
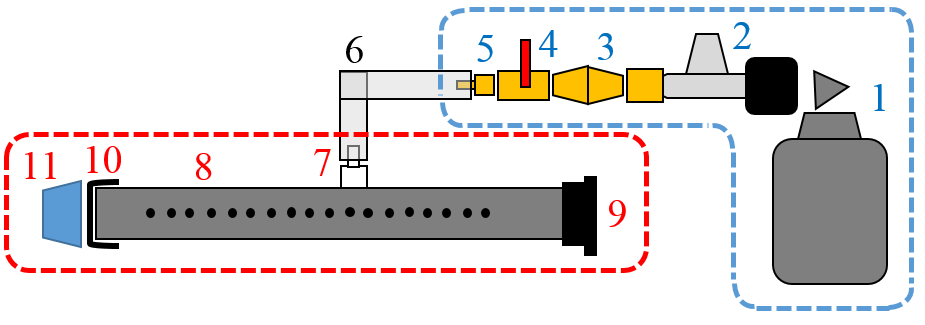
 On one end up the tube, we need to attach the duct cap. The tube is corrugated on one of the ends, and the cap will easily slide over it. Make sure you push the cap all the way onto the tube. Seal the seam between the cap and the tube with the tape of your choice.
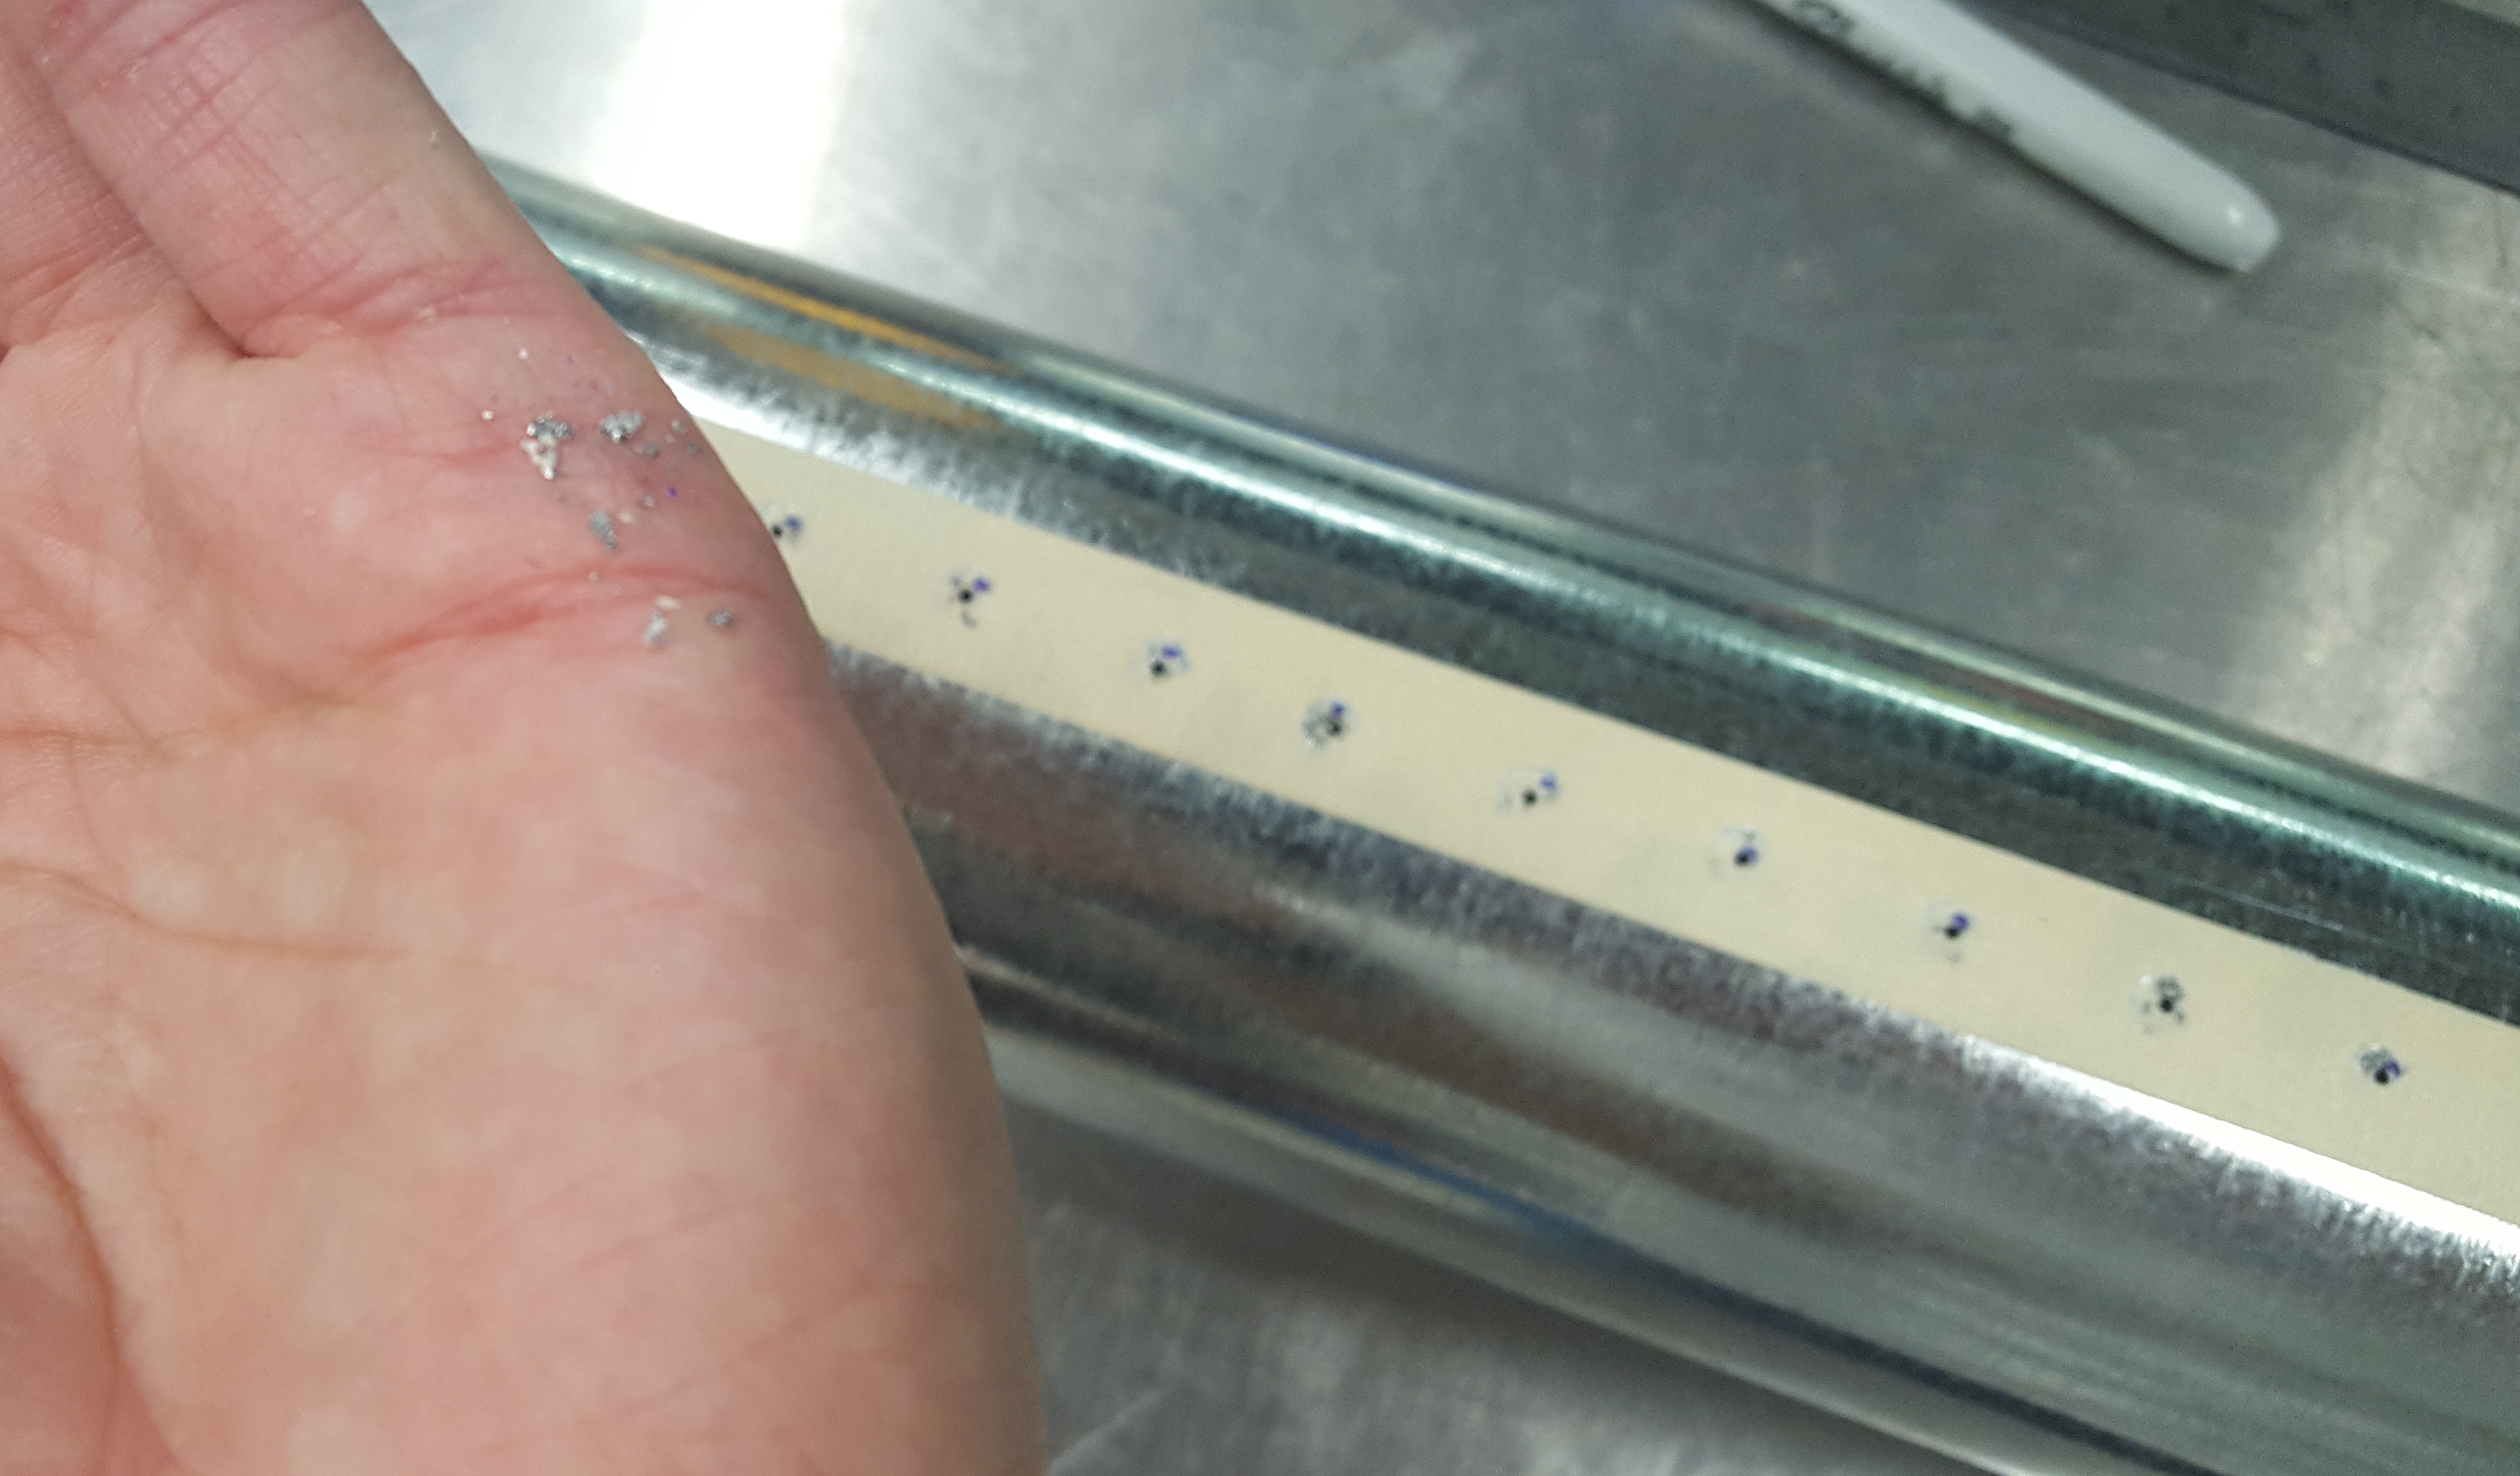
The next step is drilling the holes. You don’t need a drill press for this, just a hand-held drill. The dimensions you use here are largely up to your discretion, but I’ll give you some suggestions. First, take a piece of masking tape and, on the opposite side of the seam, tape it along the length of the tube. This is where we will be marking and drilling the holes. We don’t want to drill holes all the way to the end of the tube, so make a mark on each end about 5 inches from the ends. This is mainly to keep the flames away from the diaphragm and speaker, and to keep it symmetric on the other side.
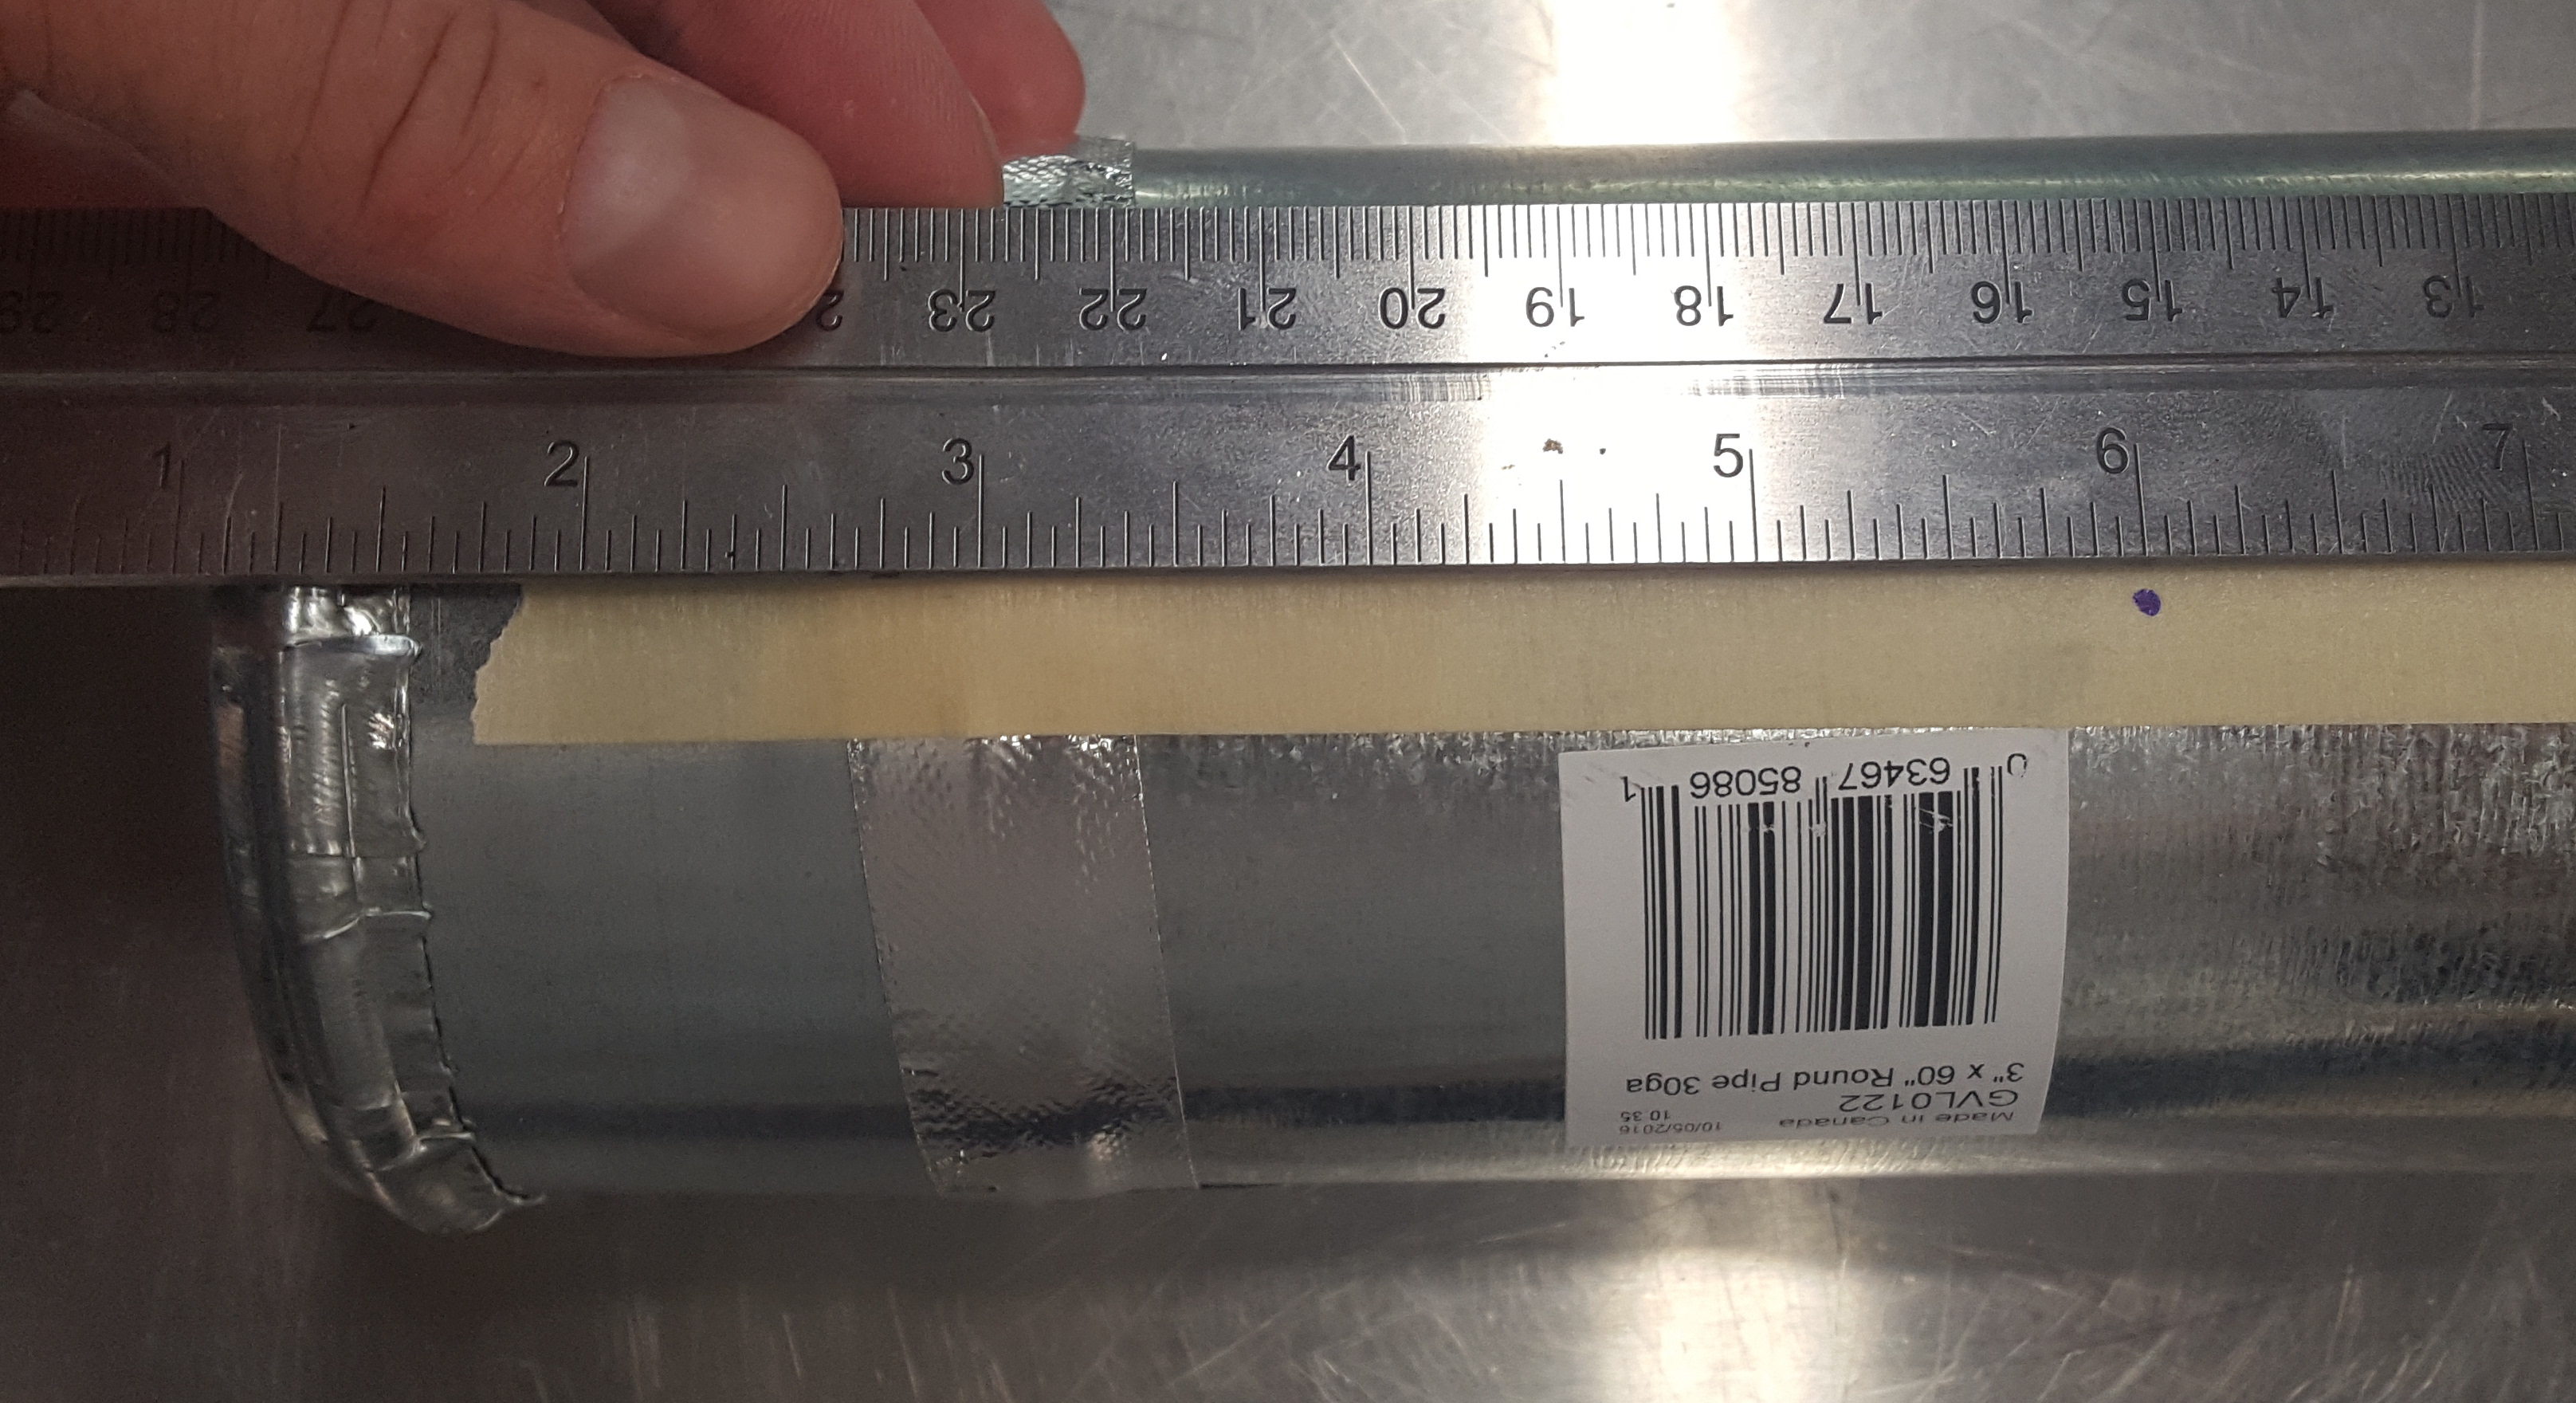 As a safe baseline design, I recommend using 1/16″ holes drilled 1″ apart. If you want the holes closer together, you can decrease the spacing, but be careful that you don’t drill them too close such that the flames from adjacent holes merge. On my second tube, I actually tried using 1/16″ holes drilled 3/4″ apart, and I liked the way it looked better. You might even be able to go down to 1/2″ hole spacing without merging flames. I wouldn’t make the holes any bigger, since the 1/16″ diameter holes work well, but it’s up to you. Once you’ve picked the hole size and spacing, take your ruler and mark the hole locations on the tape along the tube. Then take your drill and your 1/16″ bit, and drill straight down into the tube at the marked locations. Make sure you keep the drill straight up and down because the bit is small and might bend if you aren’t careful. Also be careful as you move your hand down the tube to keep it from moving, because you’ll probably get some shavings stuck to your hand, and they might cut you.
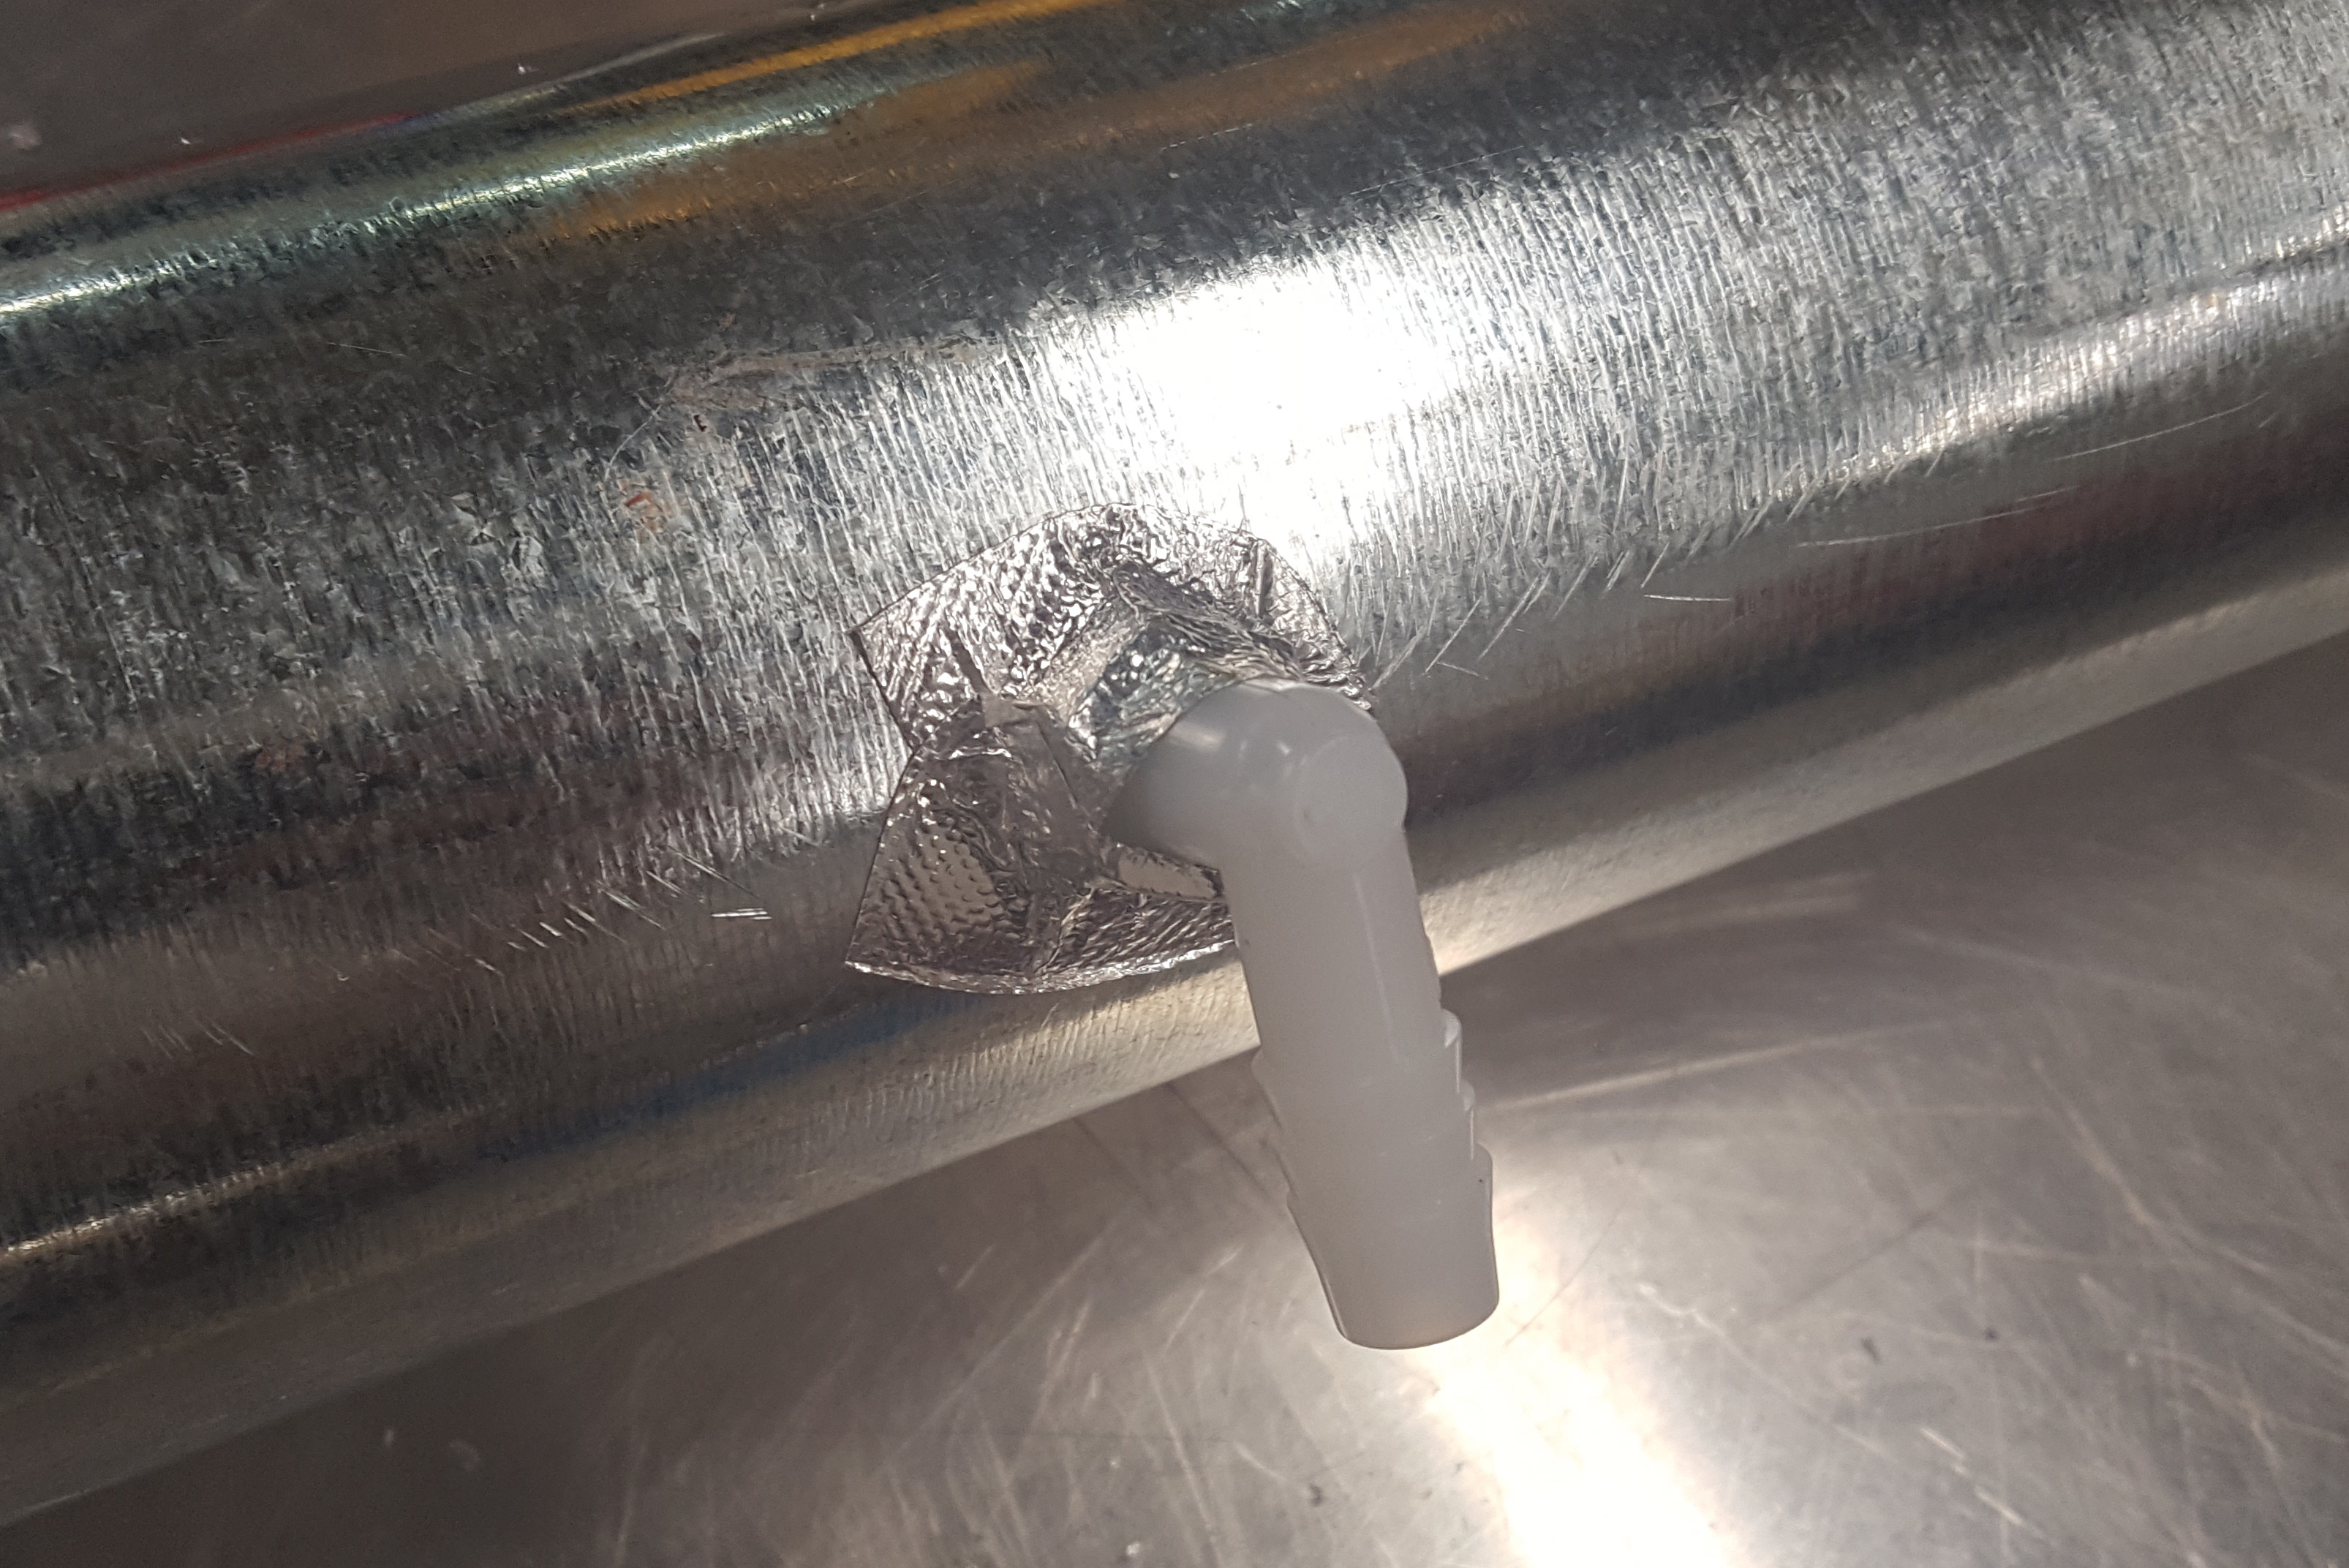
 Now we need to drill the gas inlet hole. I bought a 90 degree hose barb elbow so that we can attach a hose to one end and secure the other end into the pipe. There are three points I’ll make about why I chose this particular piece. The first is that the 1/4″ MIP size was chosen because, somewhat counter intuitively, it corresponds to a hole size of about 1/2″, and that’s the biggest drill bit I had available to drill into the tube. The second point is that because I needed the 1/4″ MIP dimension, the only part that had this size was a 90 degree elbow. The third point is that I bought the nylon part because they are cheaper than brass and we don’t need this part to be brass. The thermal conductivity of the galvanized steel is low enough that the tube barely gets warm, even after prolonged operation, so we don’t need to worry about it softening or melting.
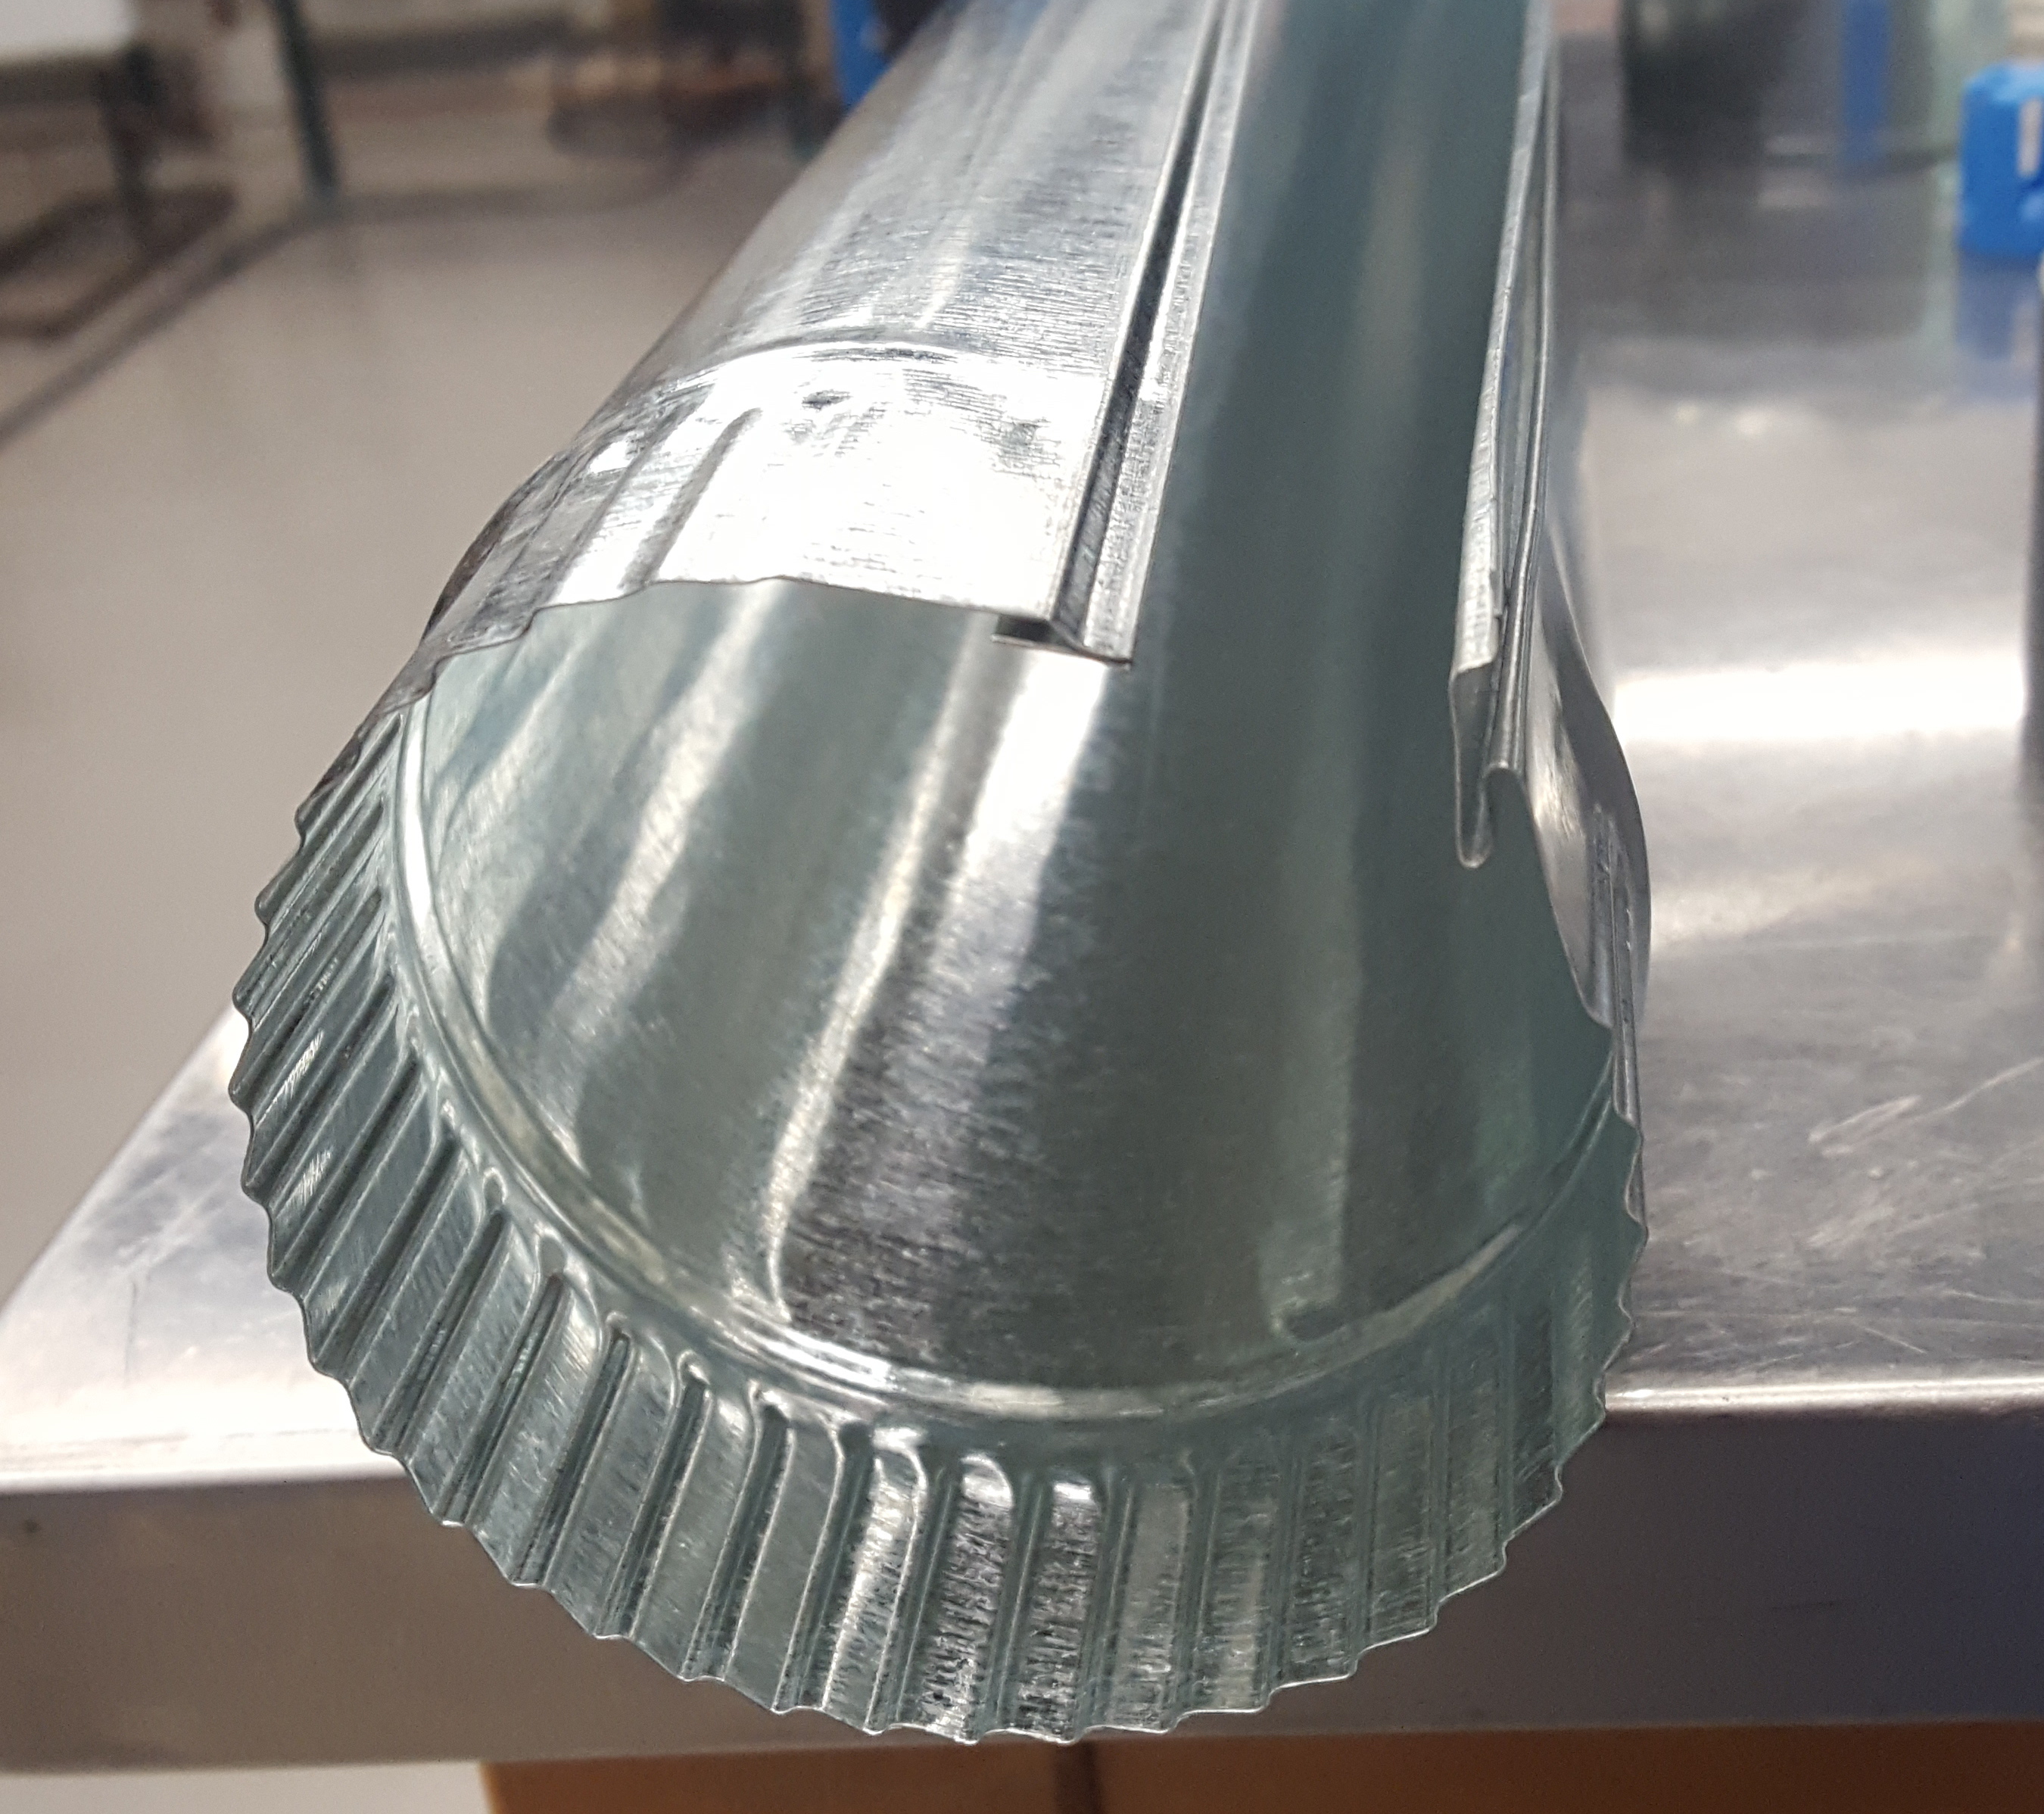
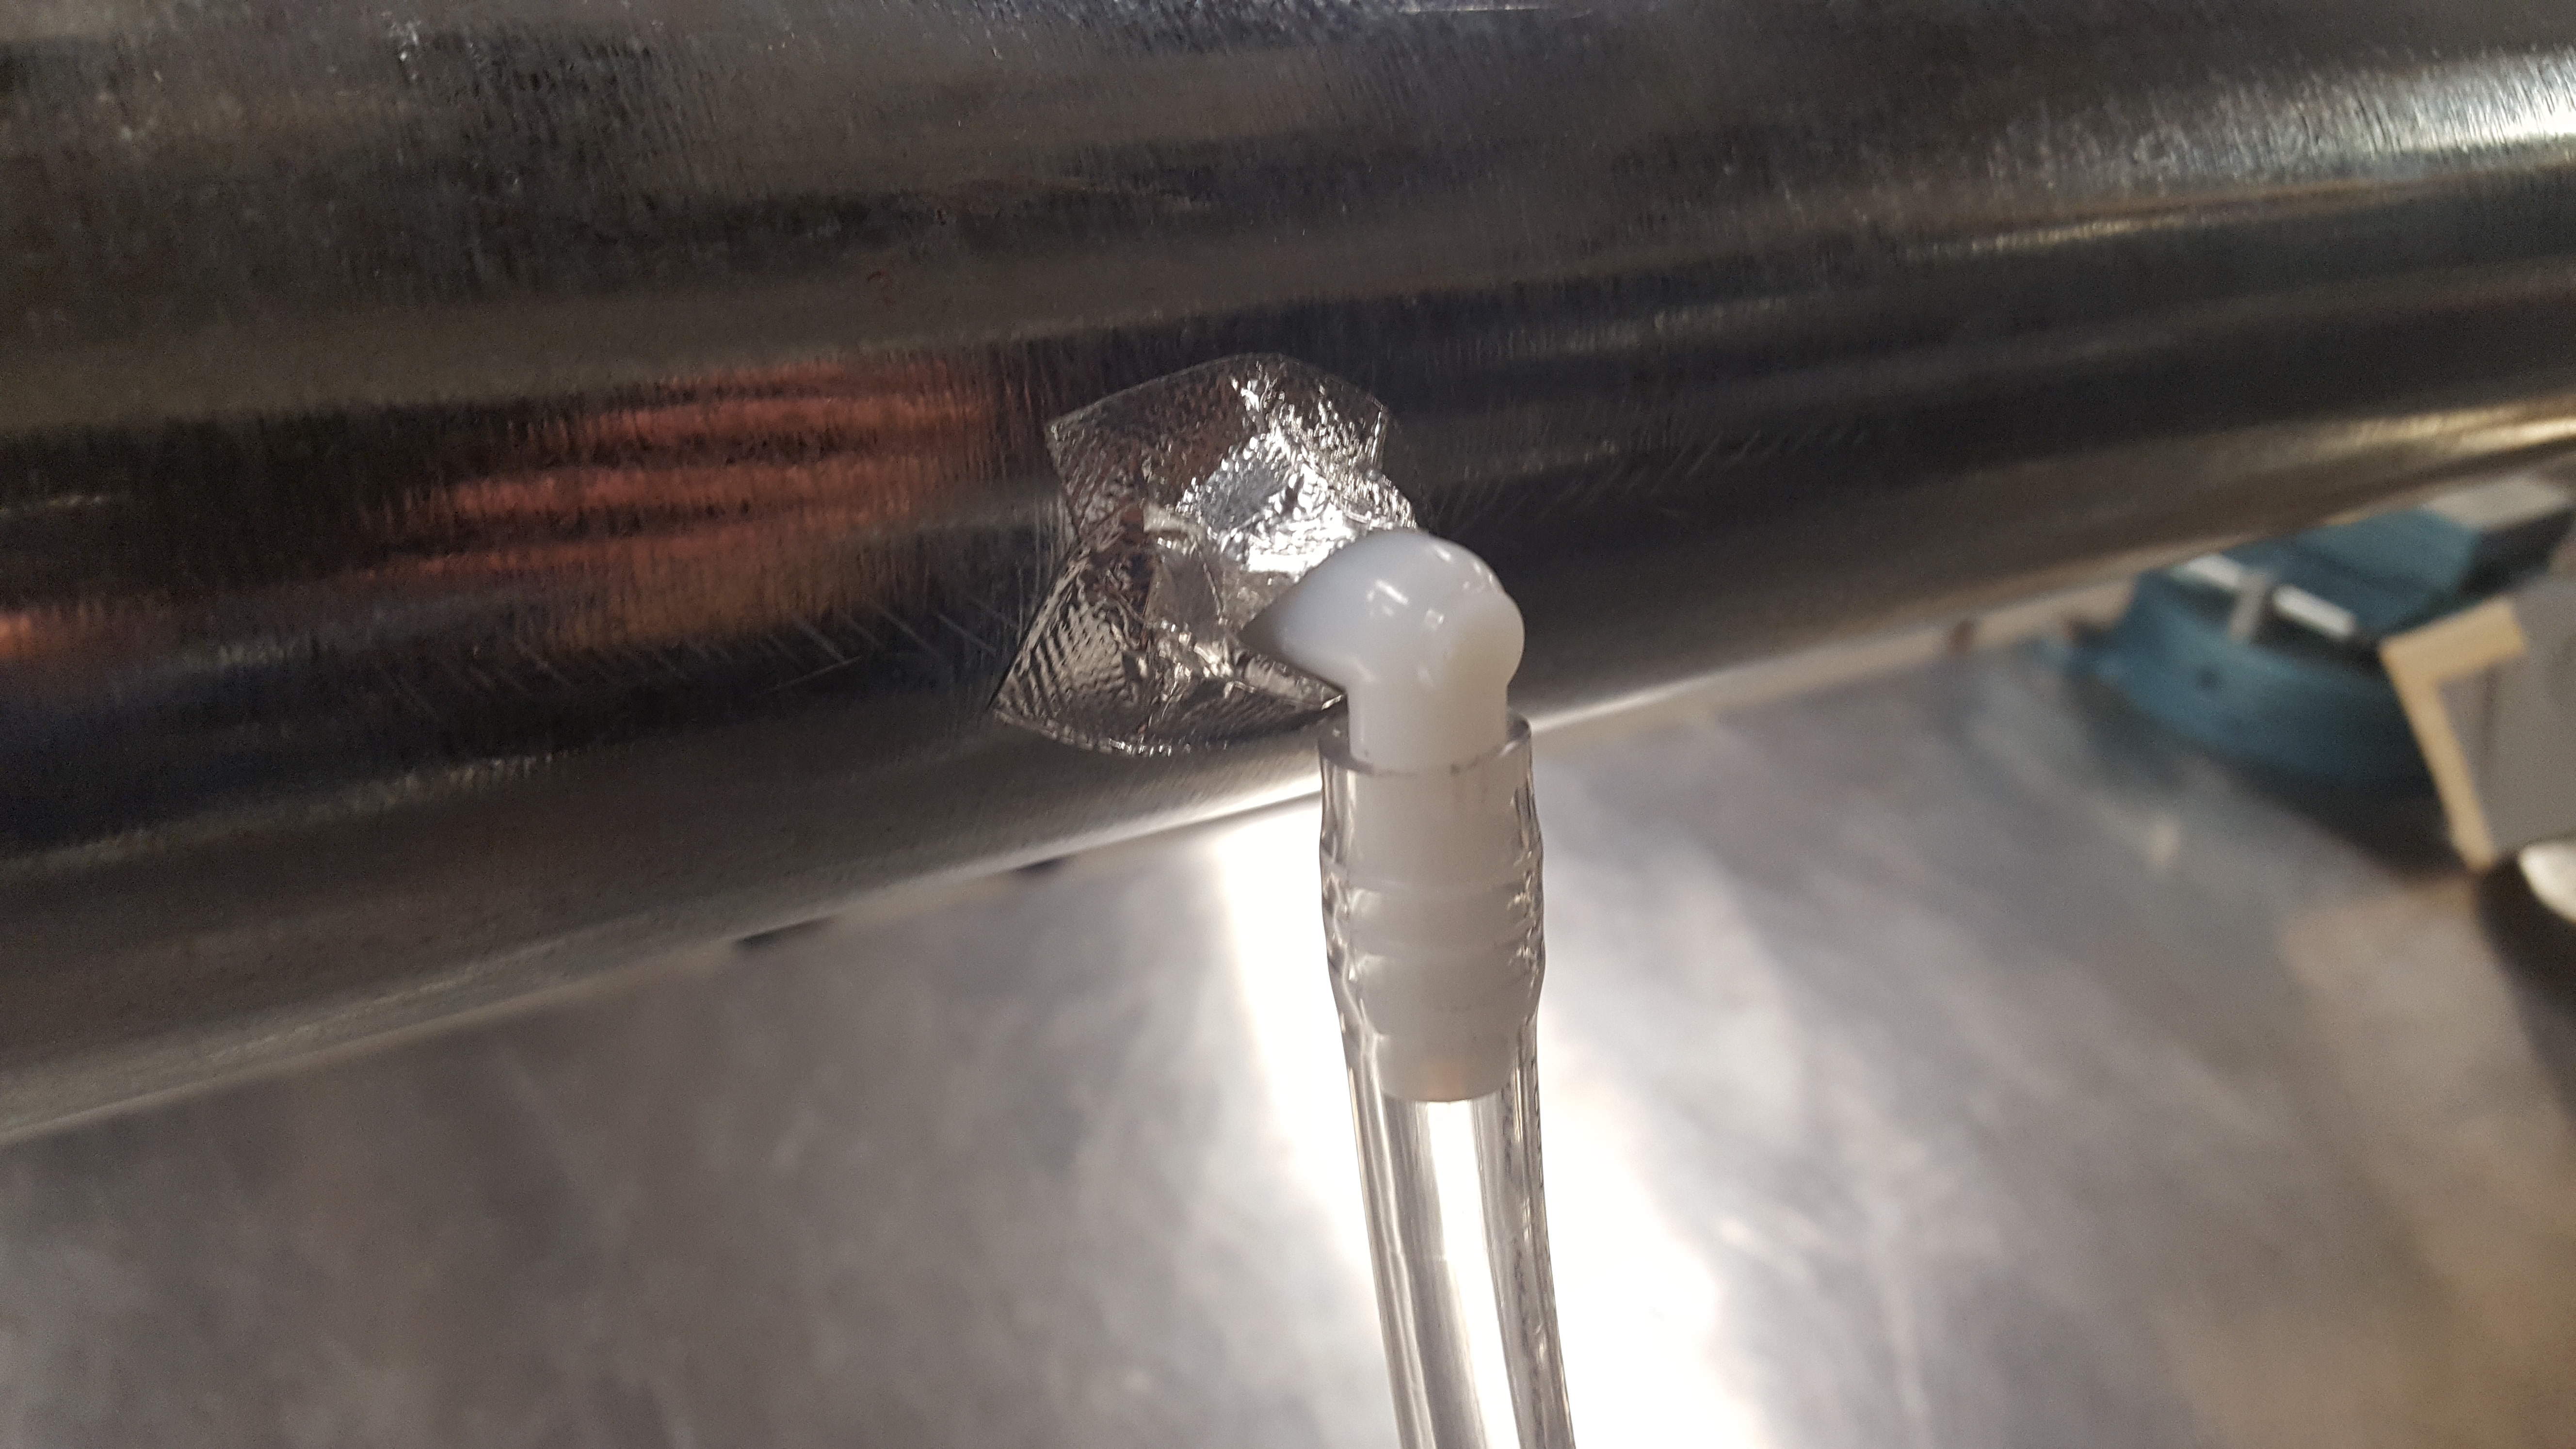
When you drill this hole, make sure you have a firm hold on the tube. I would start with a pilot hole, by which I mean take a smaller drill bit (something like 1/4″) and drill a hole through the tube. This will make it easier to keep the bigger bit centered. If you don’t do this, your big bit will probably walk away from the center that you draw on the tube, and you’ll end up with a hole that’s not where you want it to be. After drilling the pilot hole, you can grab your bigger bit and finish the hole. After drilling the hole, it’s probably going to have some sharp pieces sticking every which way, at least that’s what I found. Grab a file and make sure to file those pieces down so the hole is smooth and you don’t cut yourself. Screw in the barbed adaptor and get the orientation correct if you’re using the elbow like I am. I have it pointing down, because if it’s pointing up and you connect the tube, you’ll probably be able to see it in the background when you’re running. To make sure it doesn’t leak, I put some tape around it as you can see in the picture below.
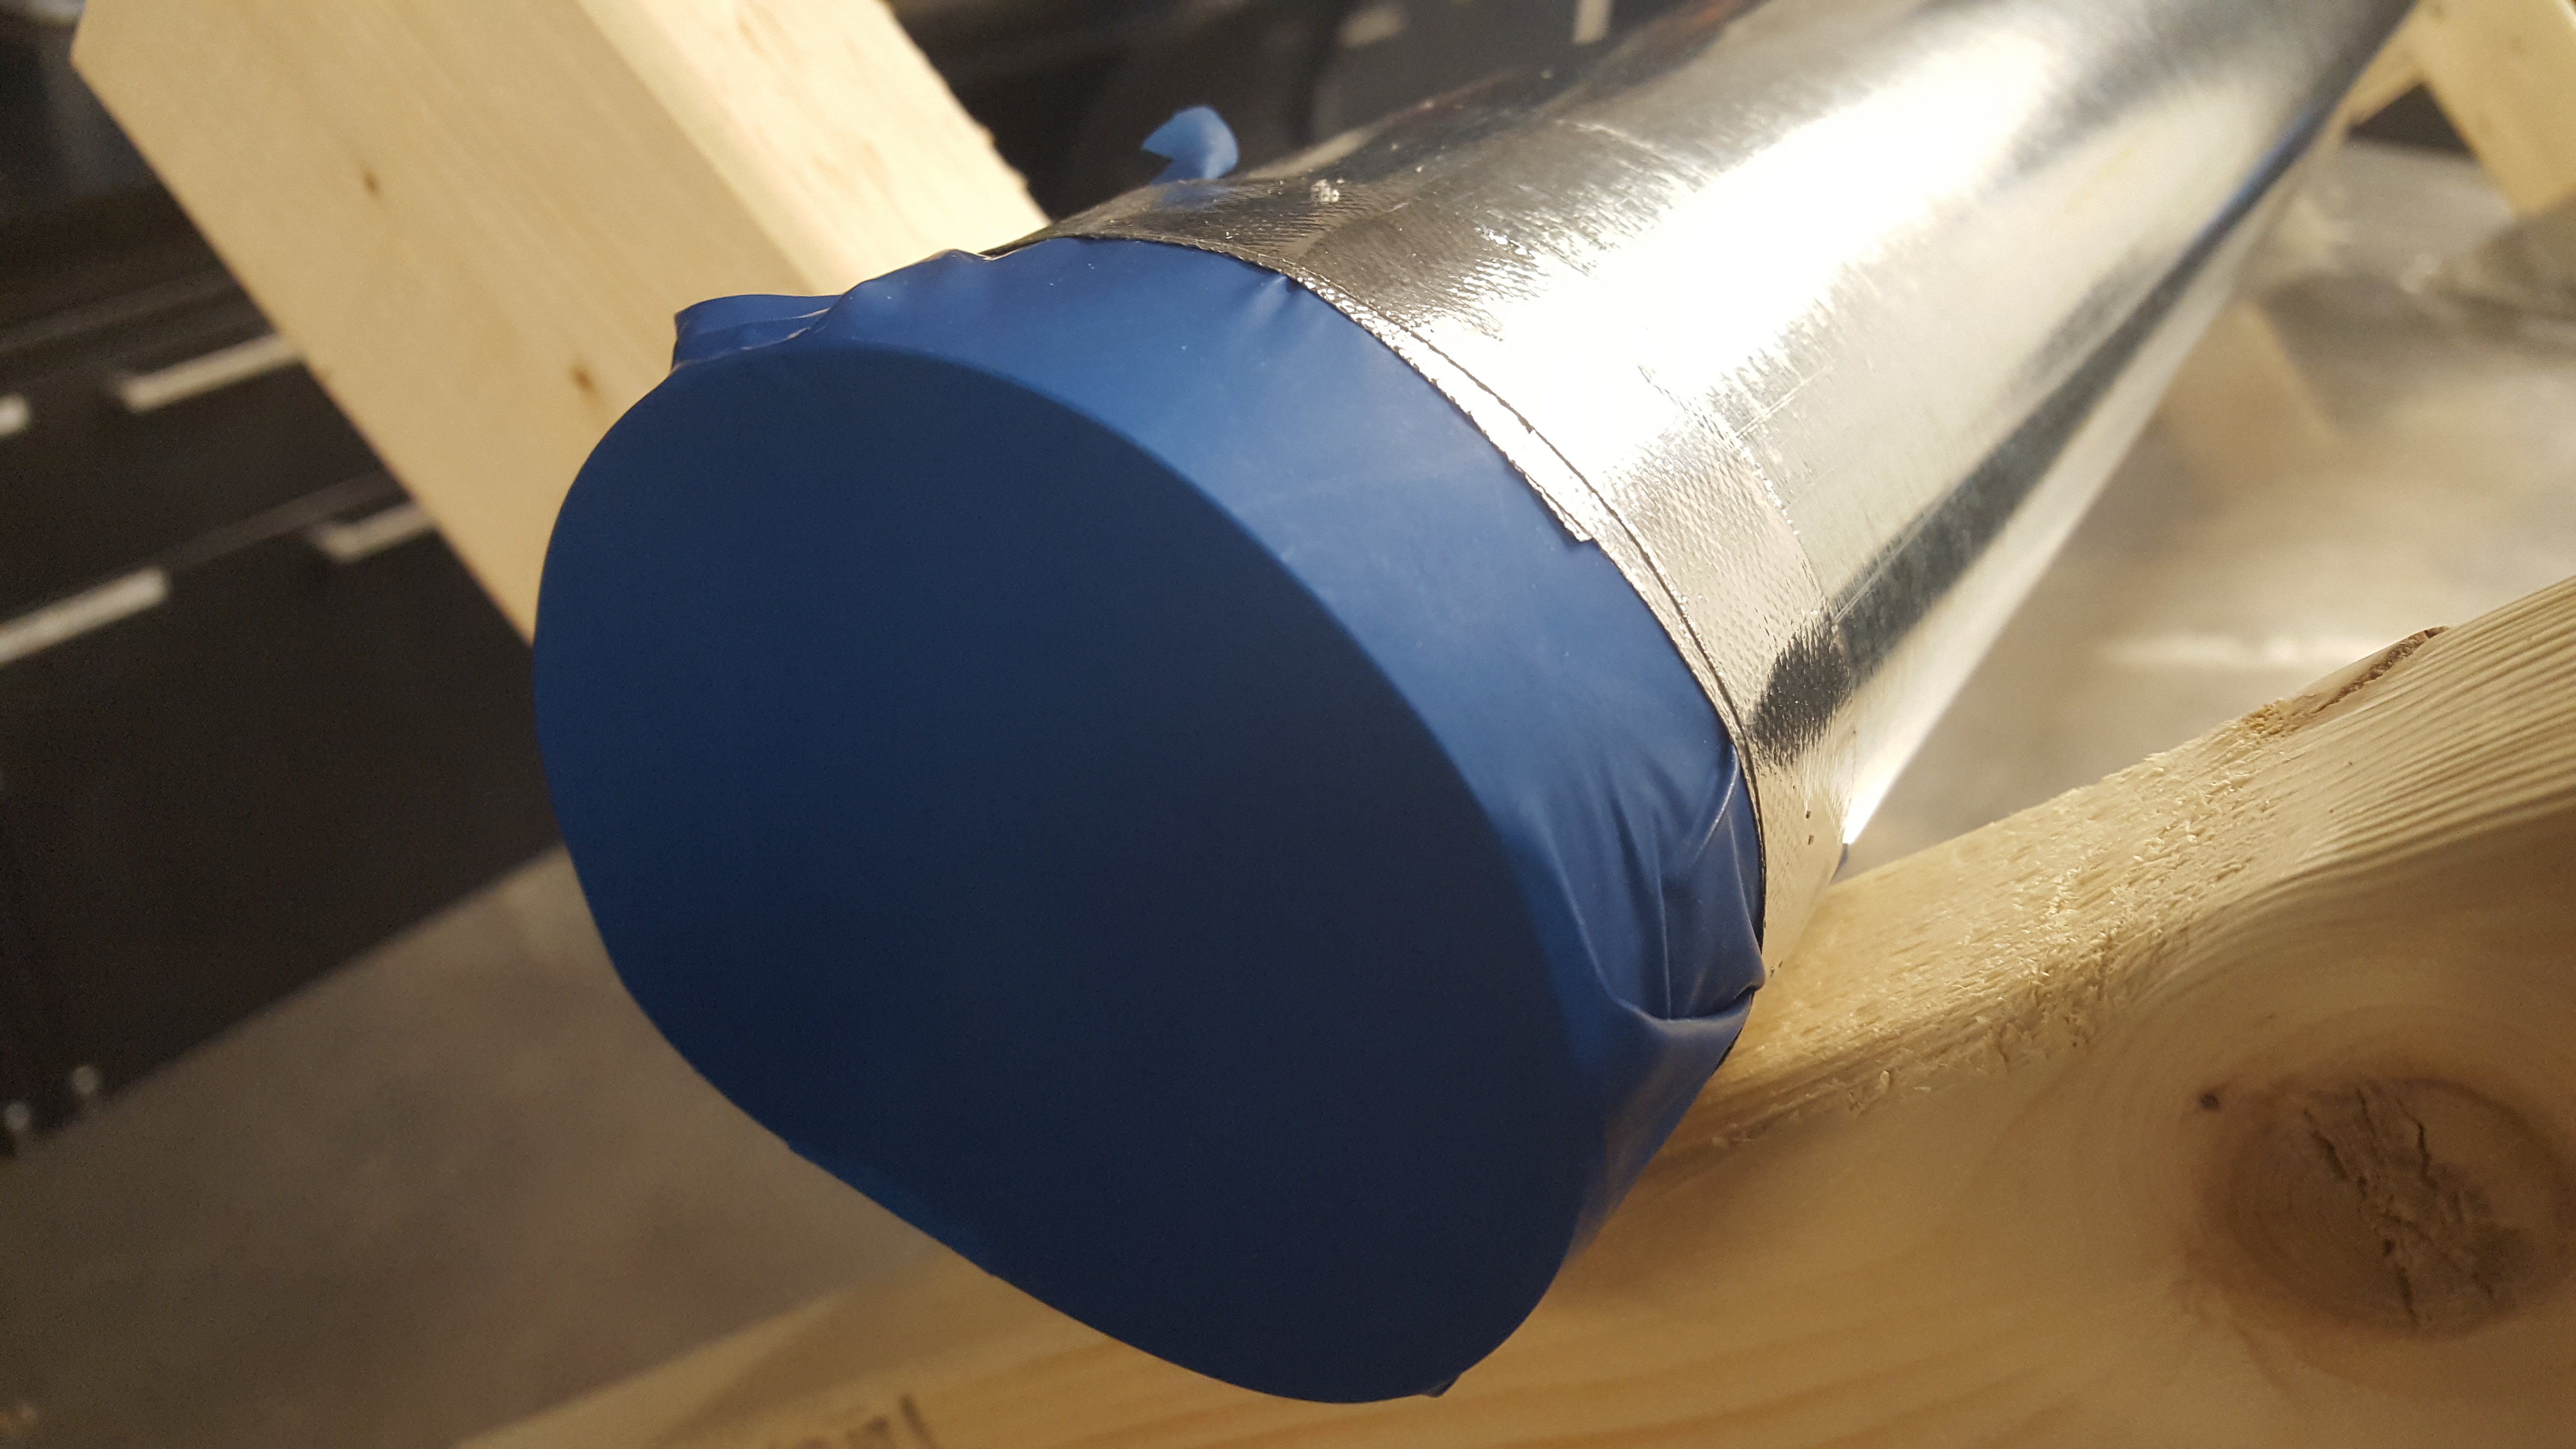
 We need to attach the diaphragm now. I’m doing this last because when you drill the holes and file them down, there will be shavings in the tube, and if you already have the diaphragm attached, you won’t be able to get all the shavings out as easily. So before you put the diaphragm on, shake the shavings out of the tube. I’m using a latex glove because that’s what I have lying around at the moment, but I think it would be easier to buy a bag of balloons and use one of those. I’m going to cut the glove up through the side so I can use the palm of the glove (since it’s quasi-flat). Again, this next part is easier with two people, but if you’re doing it alone, I would tape one part of the glove to the tube, and then move your way around circumferentially, taping as you go. Make sure there aren’t any ripples in the part covering the tube’s end.
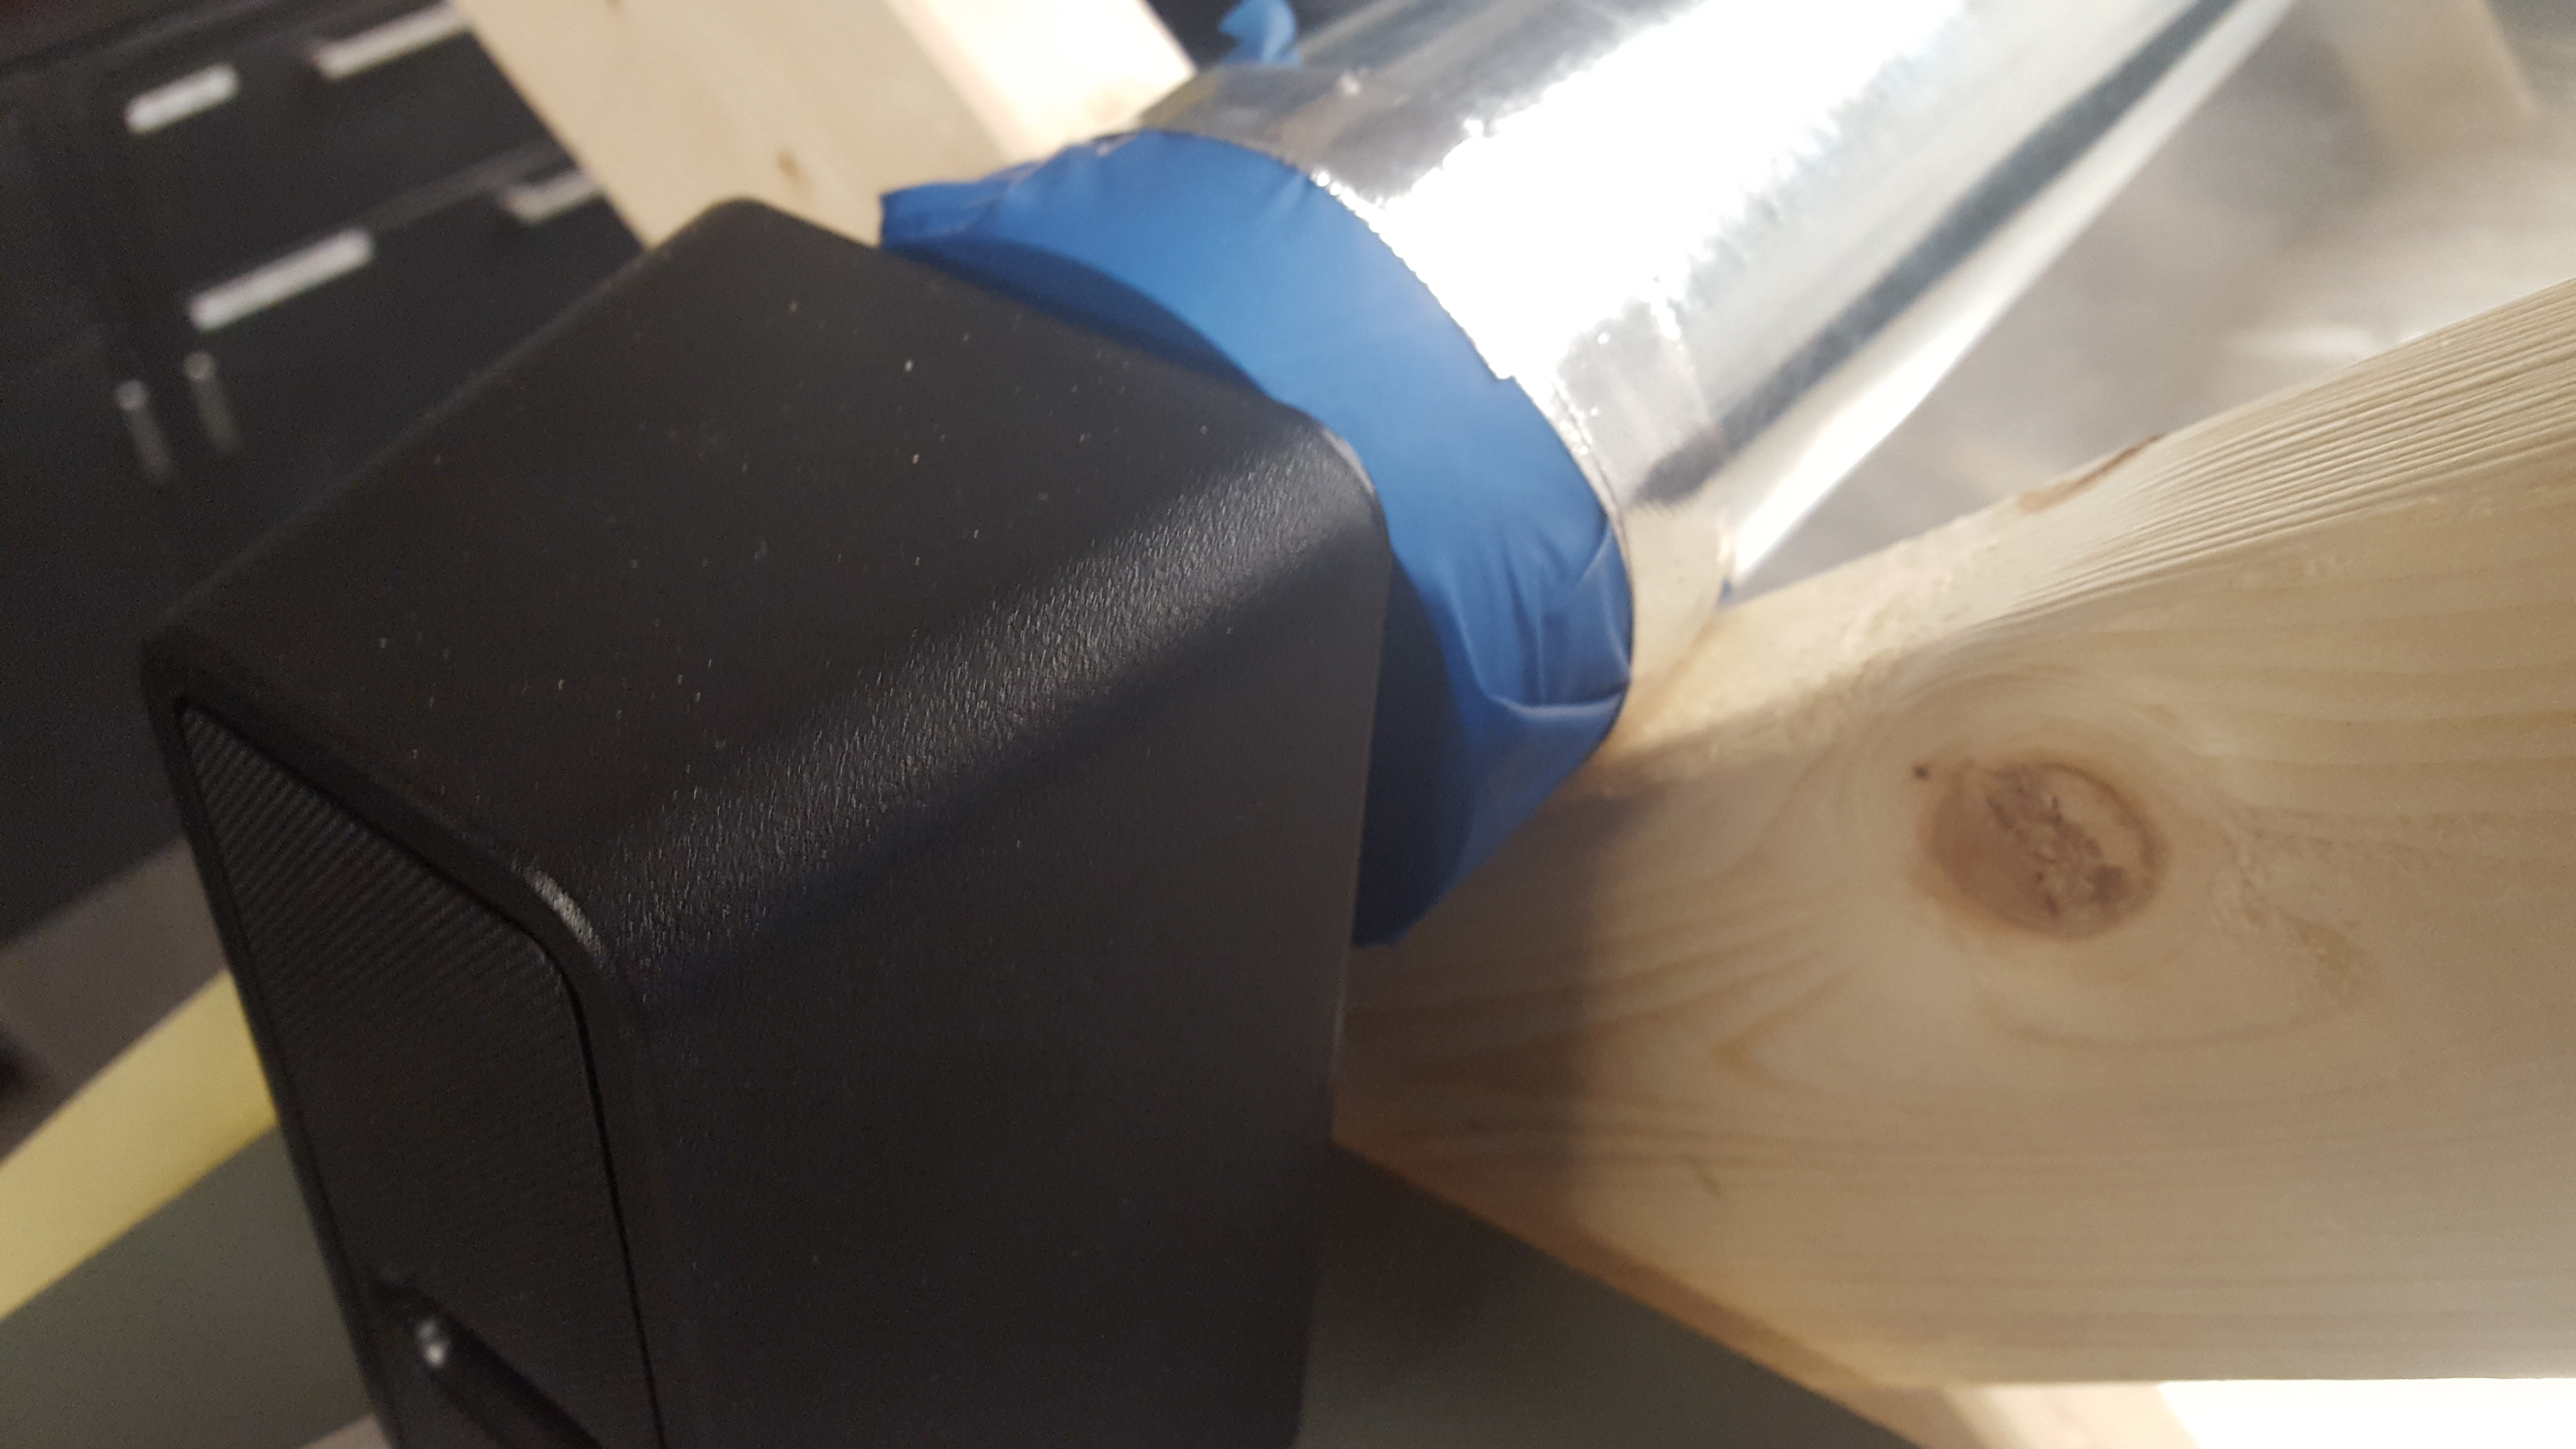
 The last thing we need to do is place the speaker up against the diaphragm as shown in the picture below.
 And that’s it, the tube section is complete! Let’s move onto the gas section.
Gas Section
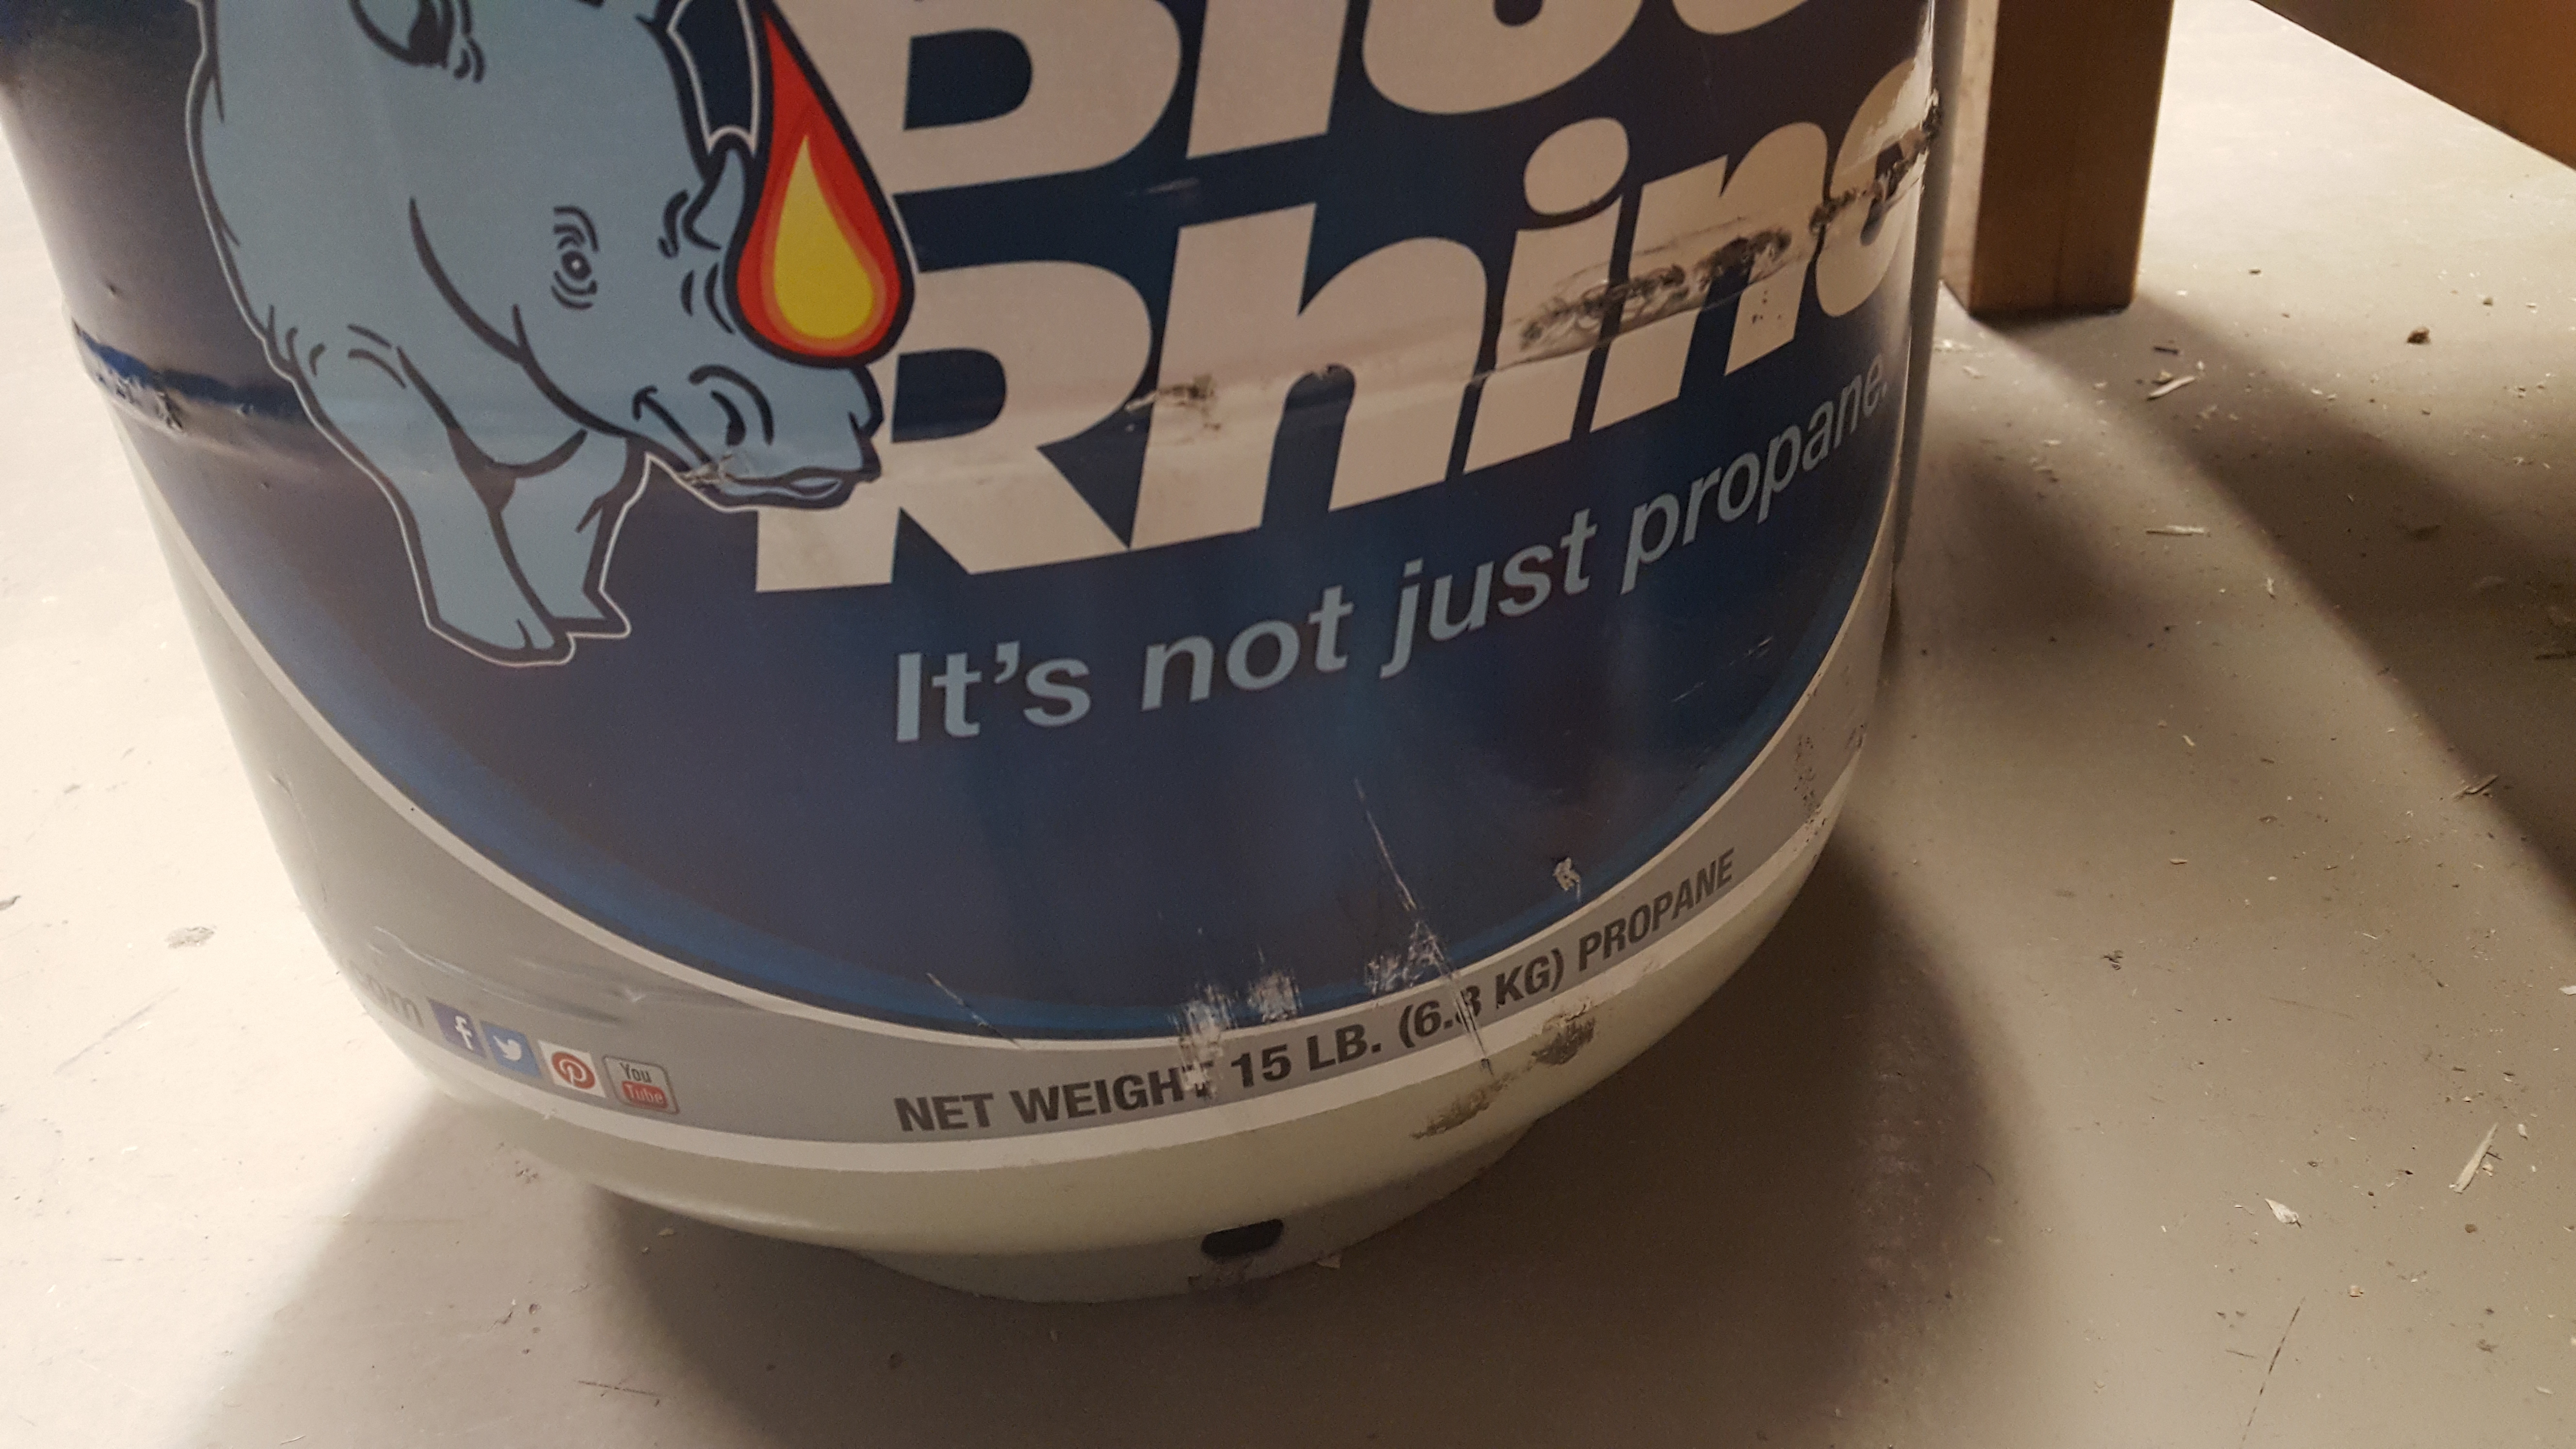
We will start with the propane tank, sitting there all by itself.
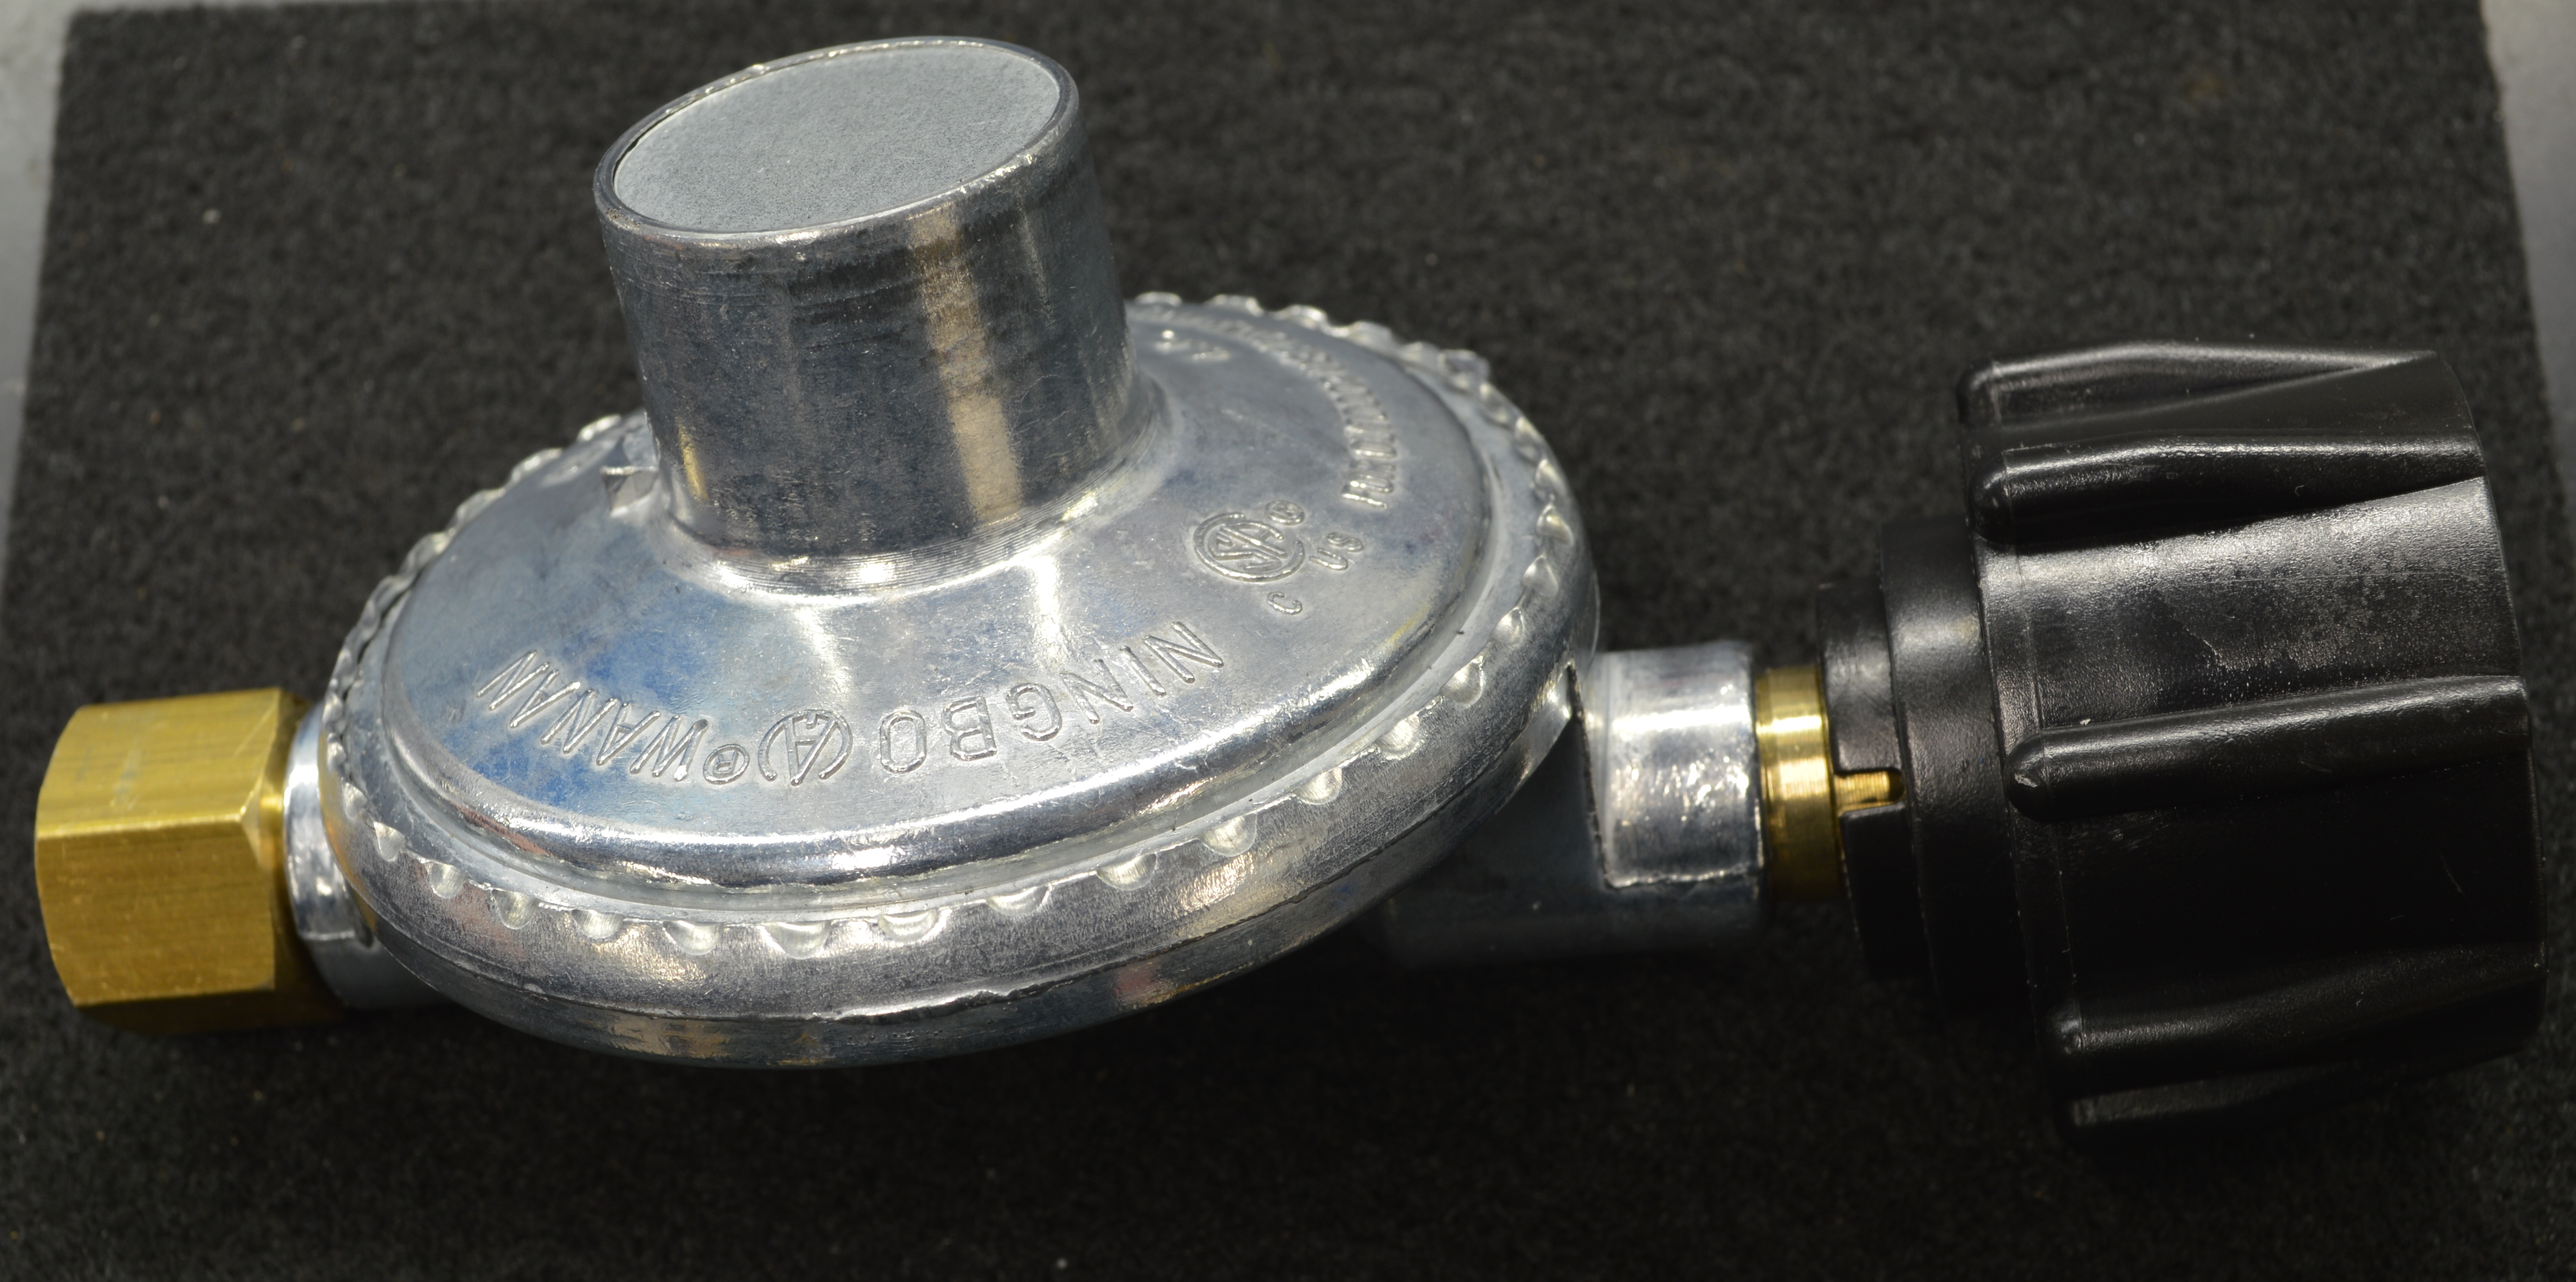
 If we just opened up the tank as is, the pressure would be dangerously high. If you’ve ever owned a grill, you know that you need to connect a regulator to the tank. The regulator essentially takes a high pressure gas and brings it down to a lower pressure. Here is a picture of the regulator. The right side screws onto the propane tank and the left side is a female 3/8″ NPT connector.
 You’ll note that on the propane tank (pictured below) there are two types of threads. One of them is an internal thread, and the other is an external thread. The inner thread is used with something called a POL valve, but we don’t need to worry about that because we’re not using it. The outer thread is pretty coarse in comparison, and is called an ACME thread. You don’t need tools to tighten the connection here, which is nice.
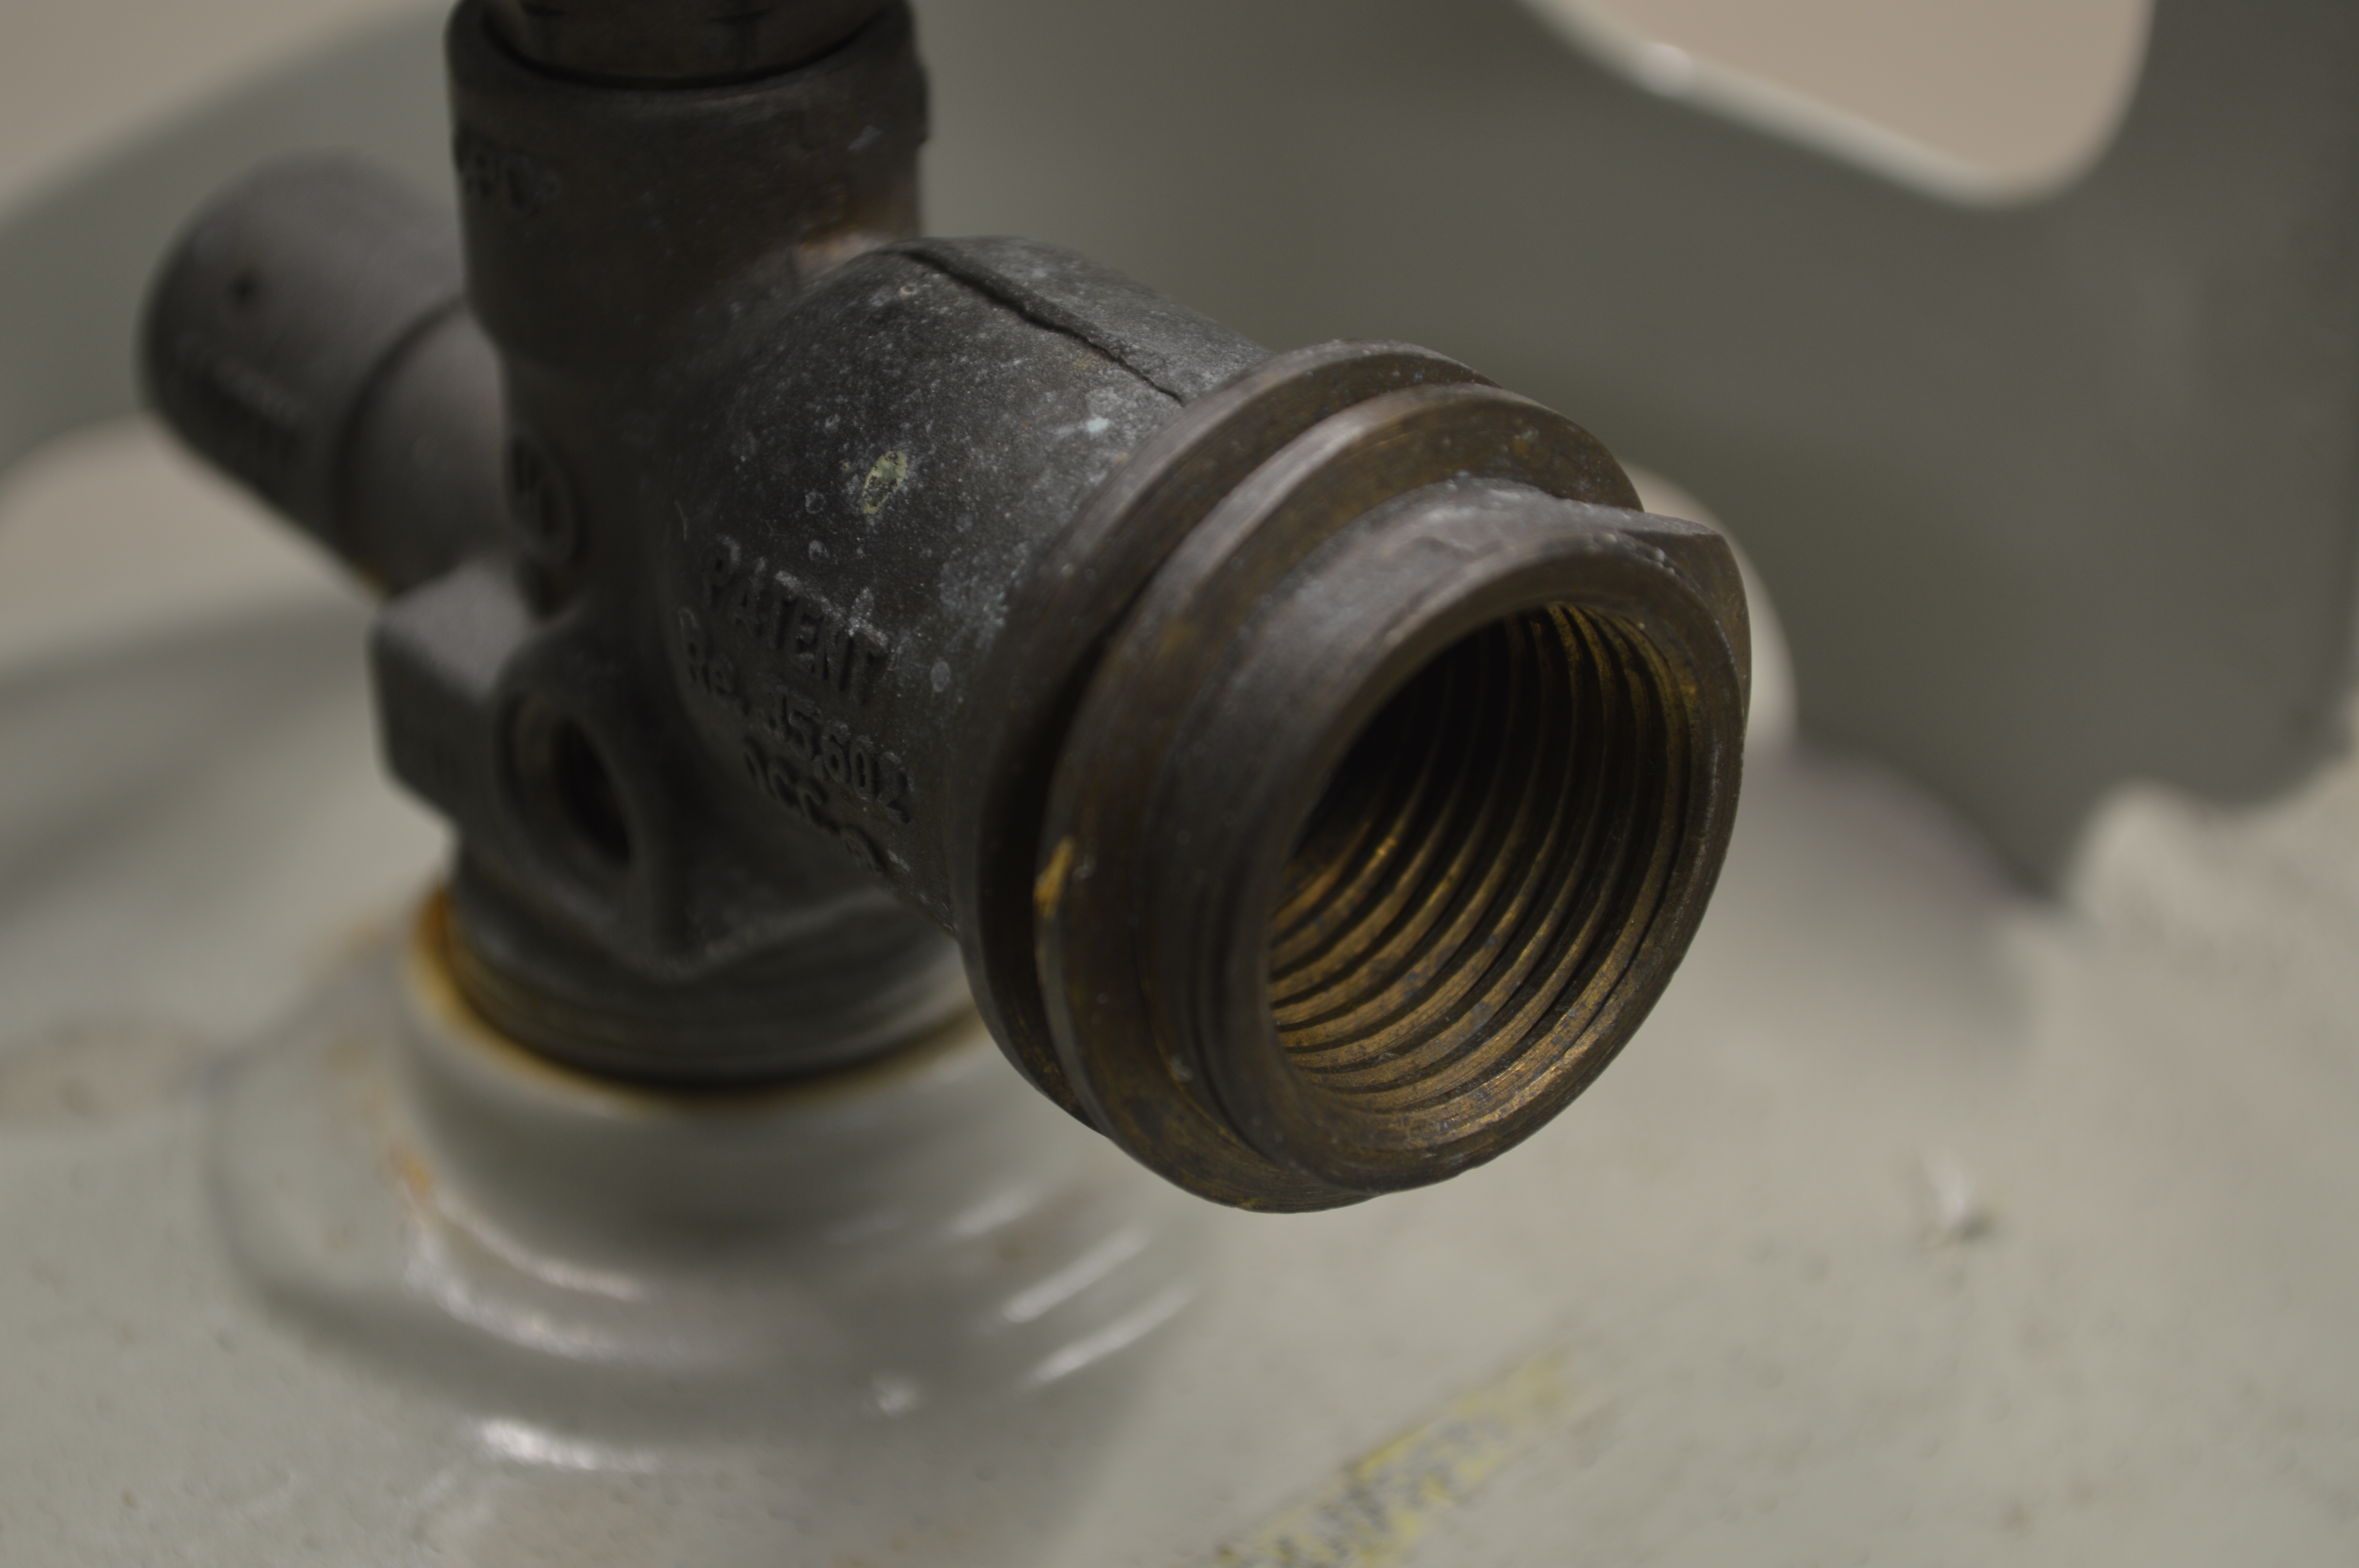 Take the regulator and screw it on, and tighten it in the clockwise direction. Again, you should only need to hand tighten the connection. That’s it, the regulator is attached! Now, the pressure that comes out of the regulator is still pretty high, and there’s no adjustability (at least with the regulator I bought and have listed here). I’d like to adjust the flow rate of the gas, so I’m going to install a ball valve. I bought a 3/8″ ball valve, which has two female NPT connectors. Because the exit of the regulator is also 3/8″ female NPT, we need some way of attaching the regulator and ball valve together. Because they are the same size, we can simply use a 3/8″ MIP hex pip nipple, which is essentially just two male connections back to back. There are two types of pipe nipple you can buy: Close or Hex. The Close type is about a dollar cheaper, but the hex type will be easier to tighten because you can hold it with a wrench.
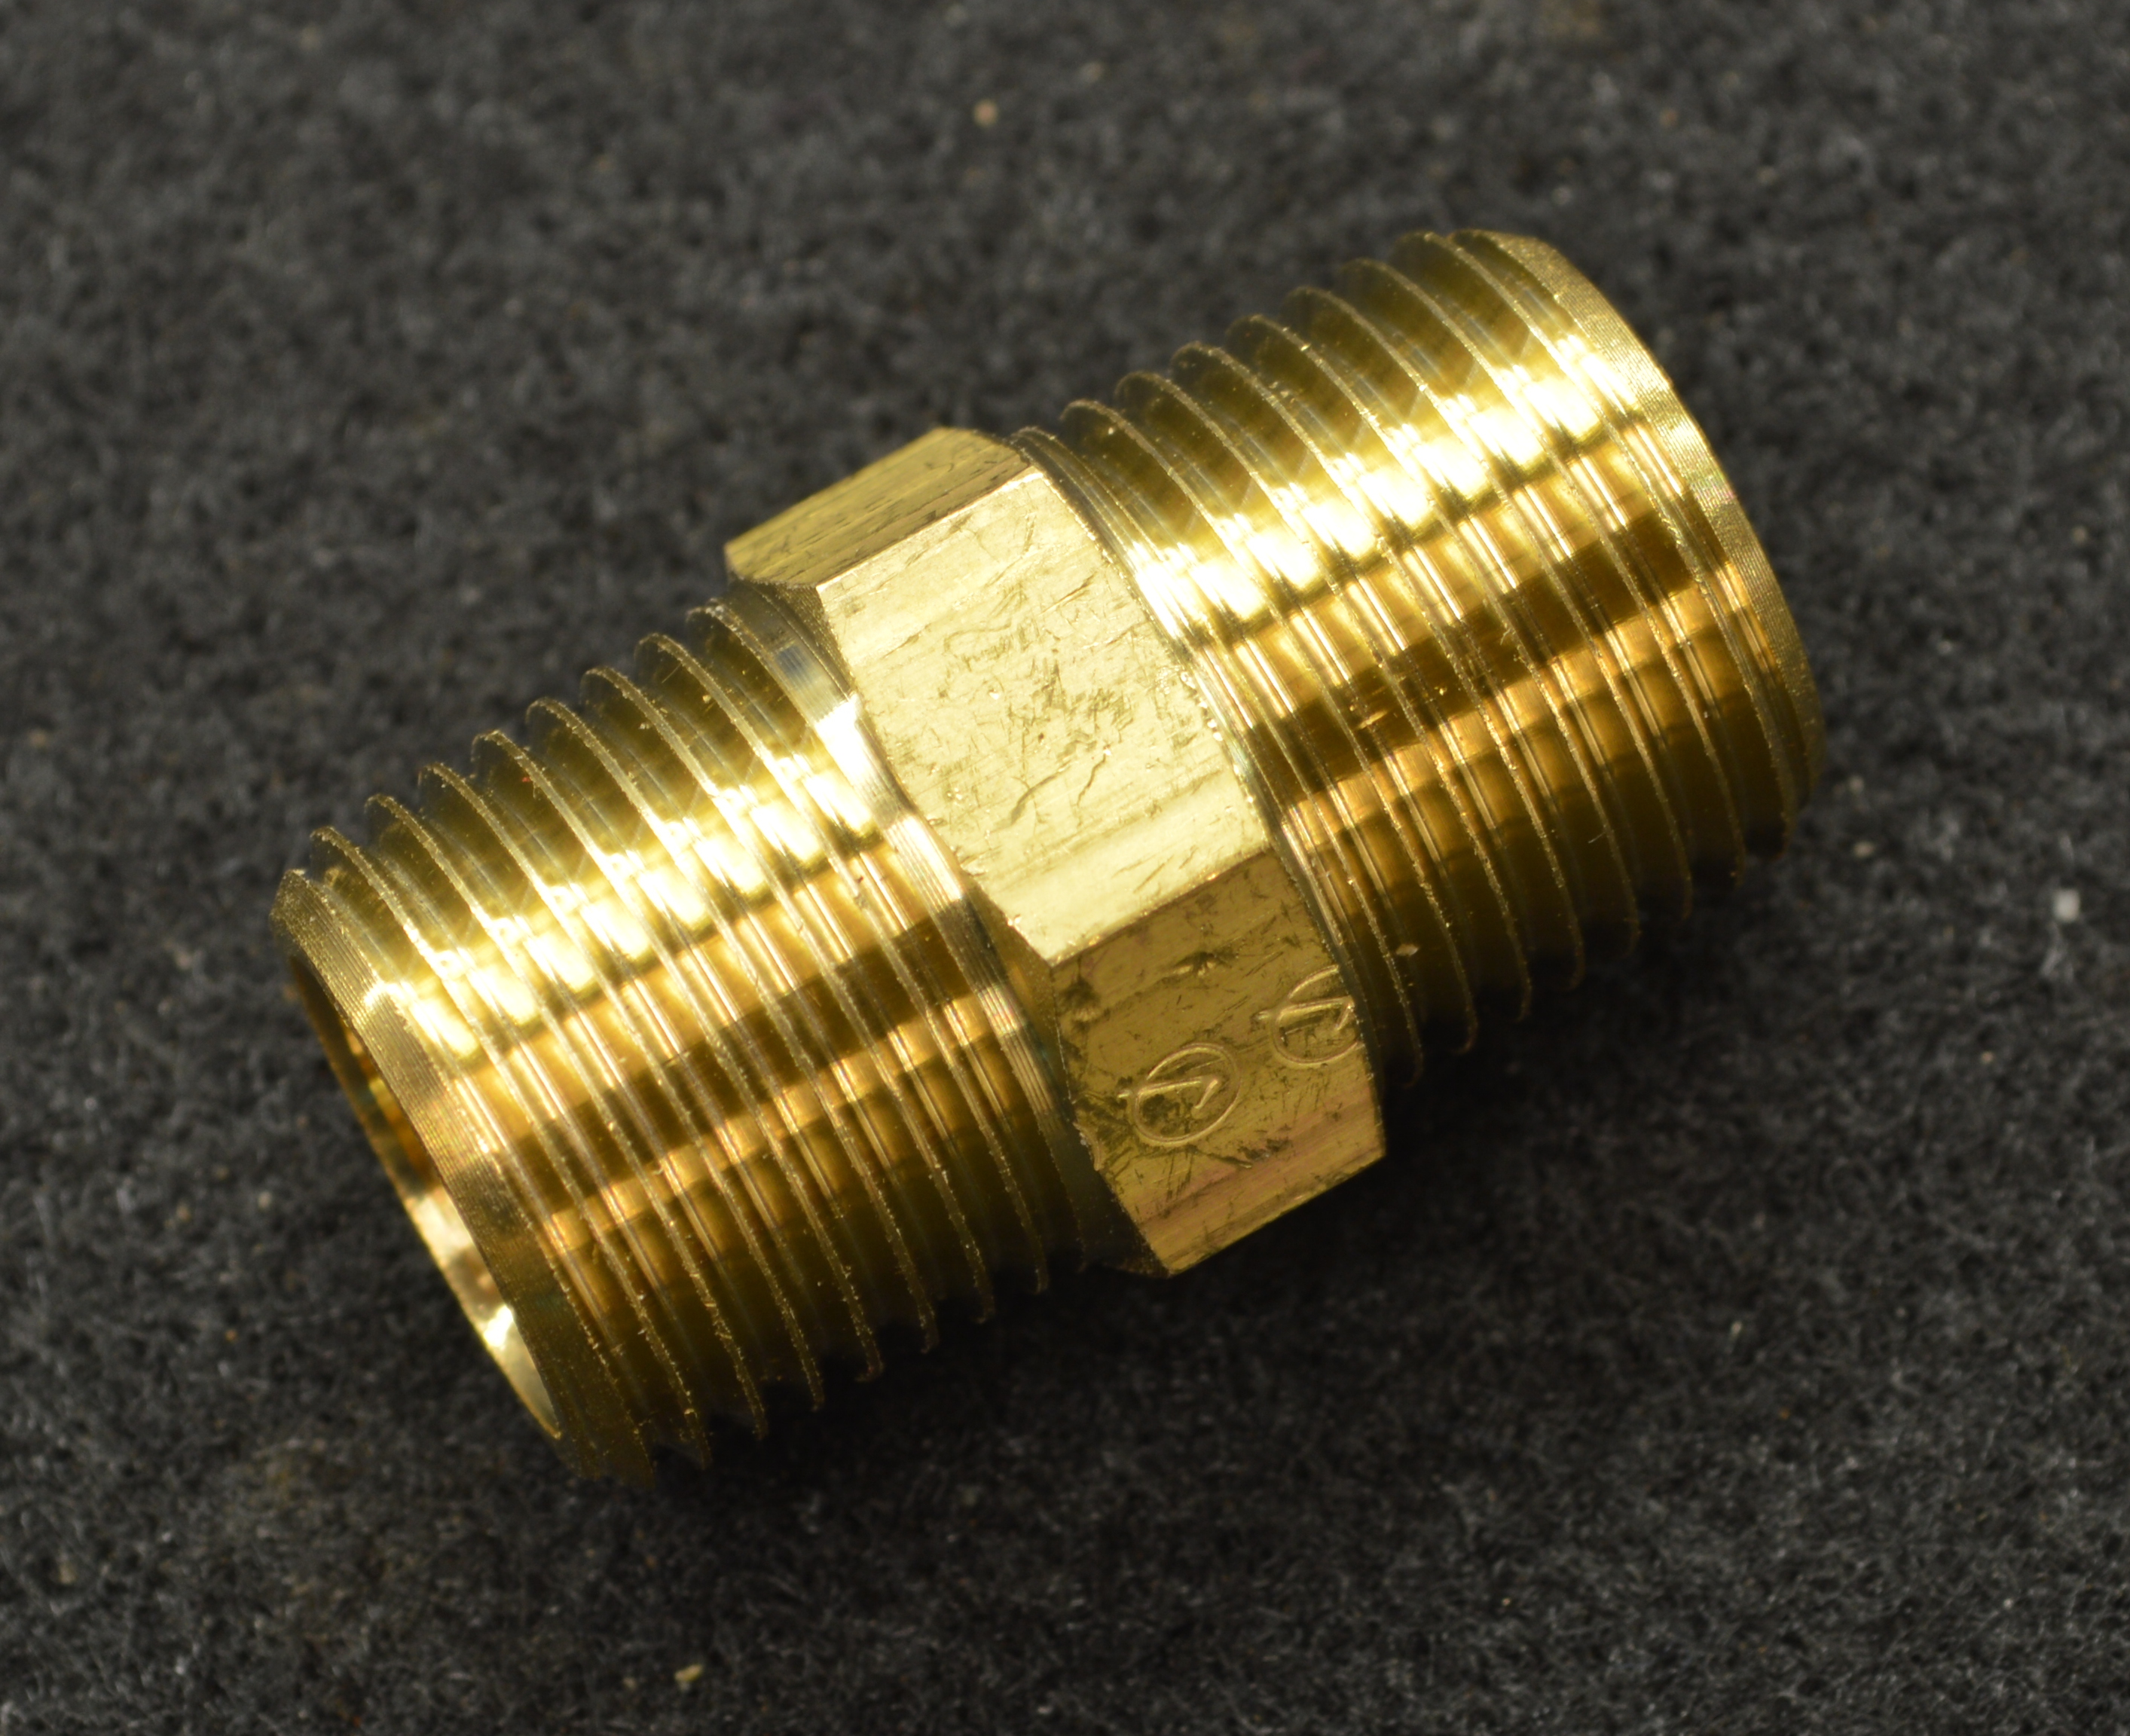 One thing to note at this point, and you might (or might not) be able to see it in the picture, is that both ends of the nipple are actually tapered slightly. That is, the diameter is largest at the center and decreases as we move outward. This type of fitting is called an NPT (national pipe thread/taper) fitting. You might also note that some parts that I’ve named have the letters MIP, which stands for Male Iron Pipe. It’s essentially just another way of saying male NPT. The regulator exit and ball valve are also NPT, but I bring it up now because you can see it better on an external thread. Another thing that needs to be brought up at this point before screwing things in, is that when using NPT fittings, we need to use PTFE (or Teflon) tape.
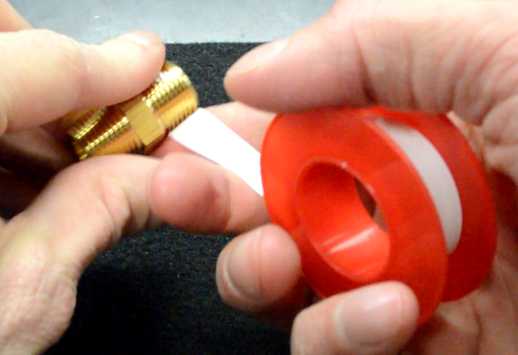
 This ensures there are no leaks when everything is tightened together. Obviously you’ll need to wrap the male parts with the tape. You also need to make sure you wrap it in the correct direction. If you don’t, then when you’re screwing it in, the tape will start to come off and bunch up in certain spots and you won’t get a seal. So when you’re taping it, make sure that when you screw it in, it will act to tighten the tape around the threads. Here’s how to make sure it’s correct every time (for right-handed threads). Hold the pipe nipple in your left hand (pointing away from you) and the tape in your right. Pull out a little piece of tape and put it under the part and hold it in place with your finger. Then start rolling the pipe nipple towards the tape roll, clockwise. About three wraps or so should be fine. At the end, you’re going to leak check all the joints anyway, so if something isn’t wrapped enough, or too much, you’ll find out with the leak check.
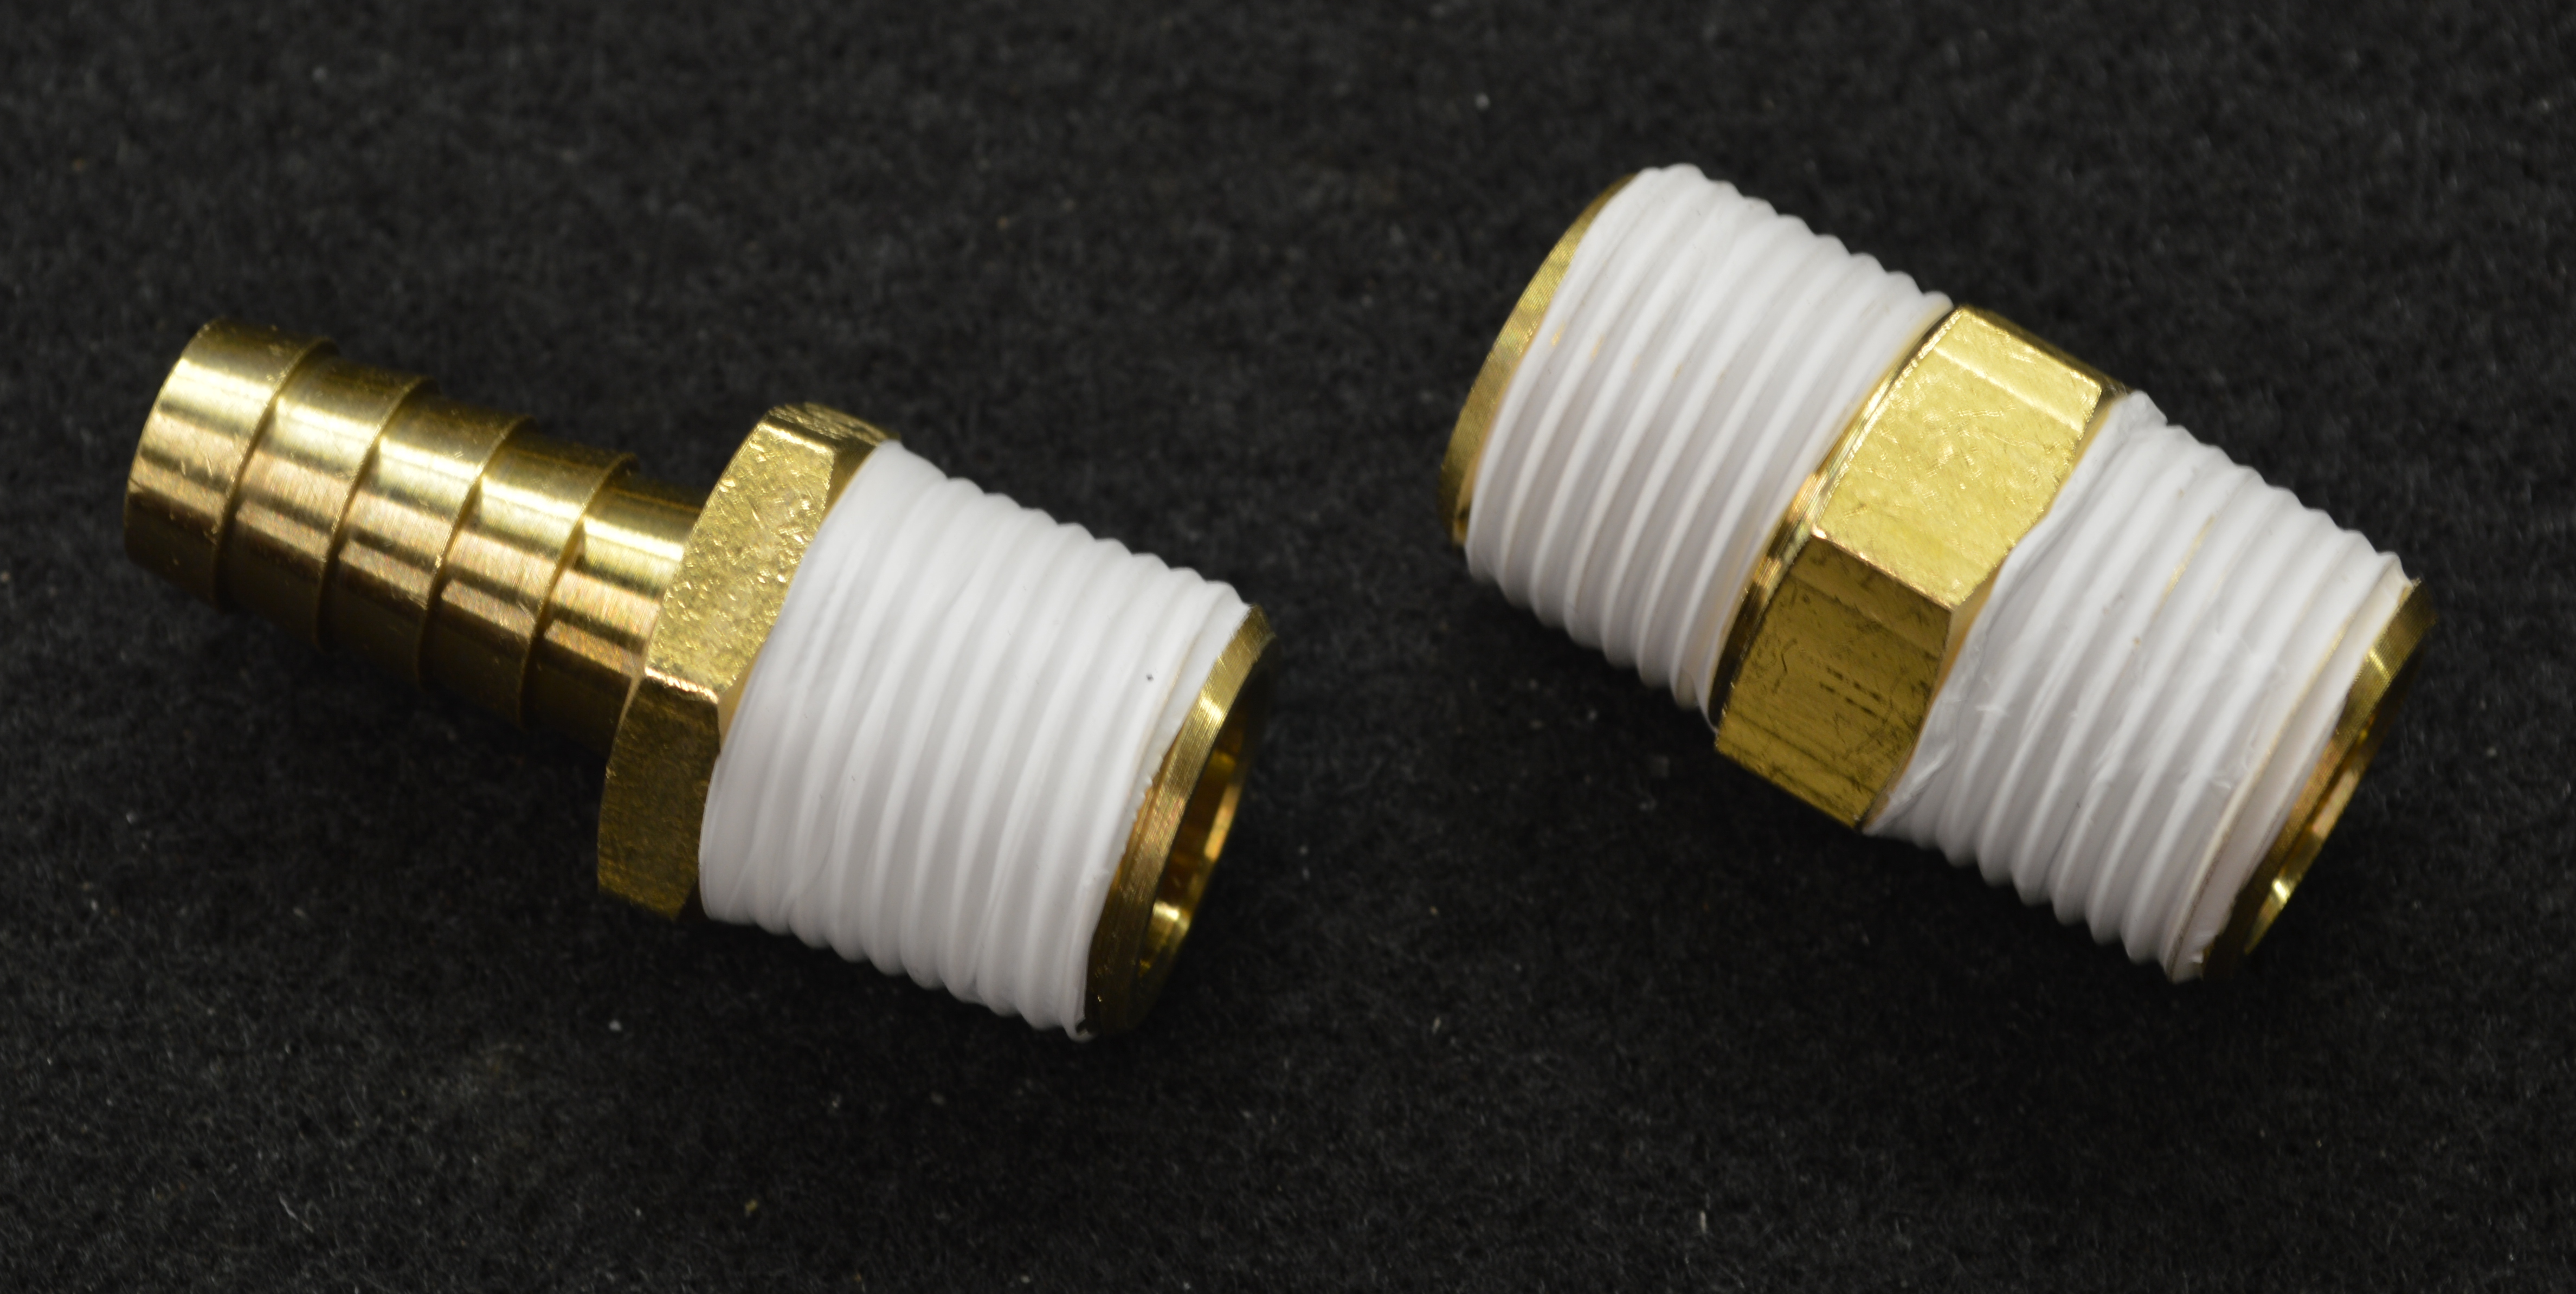
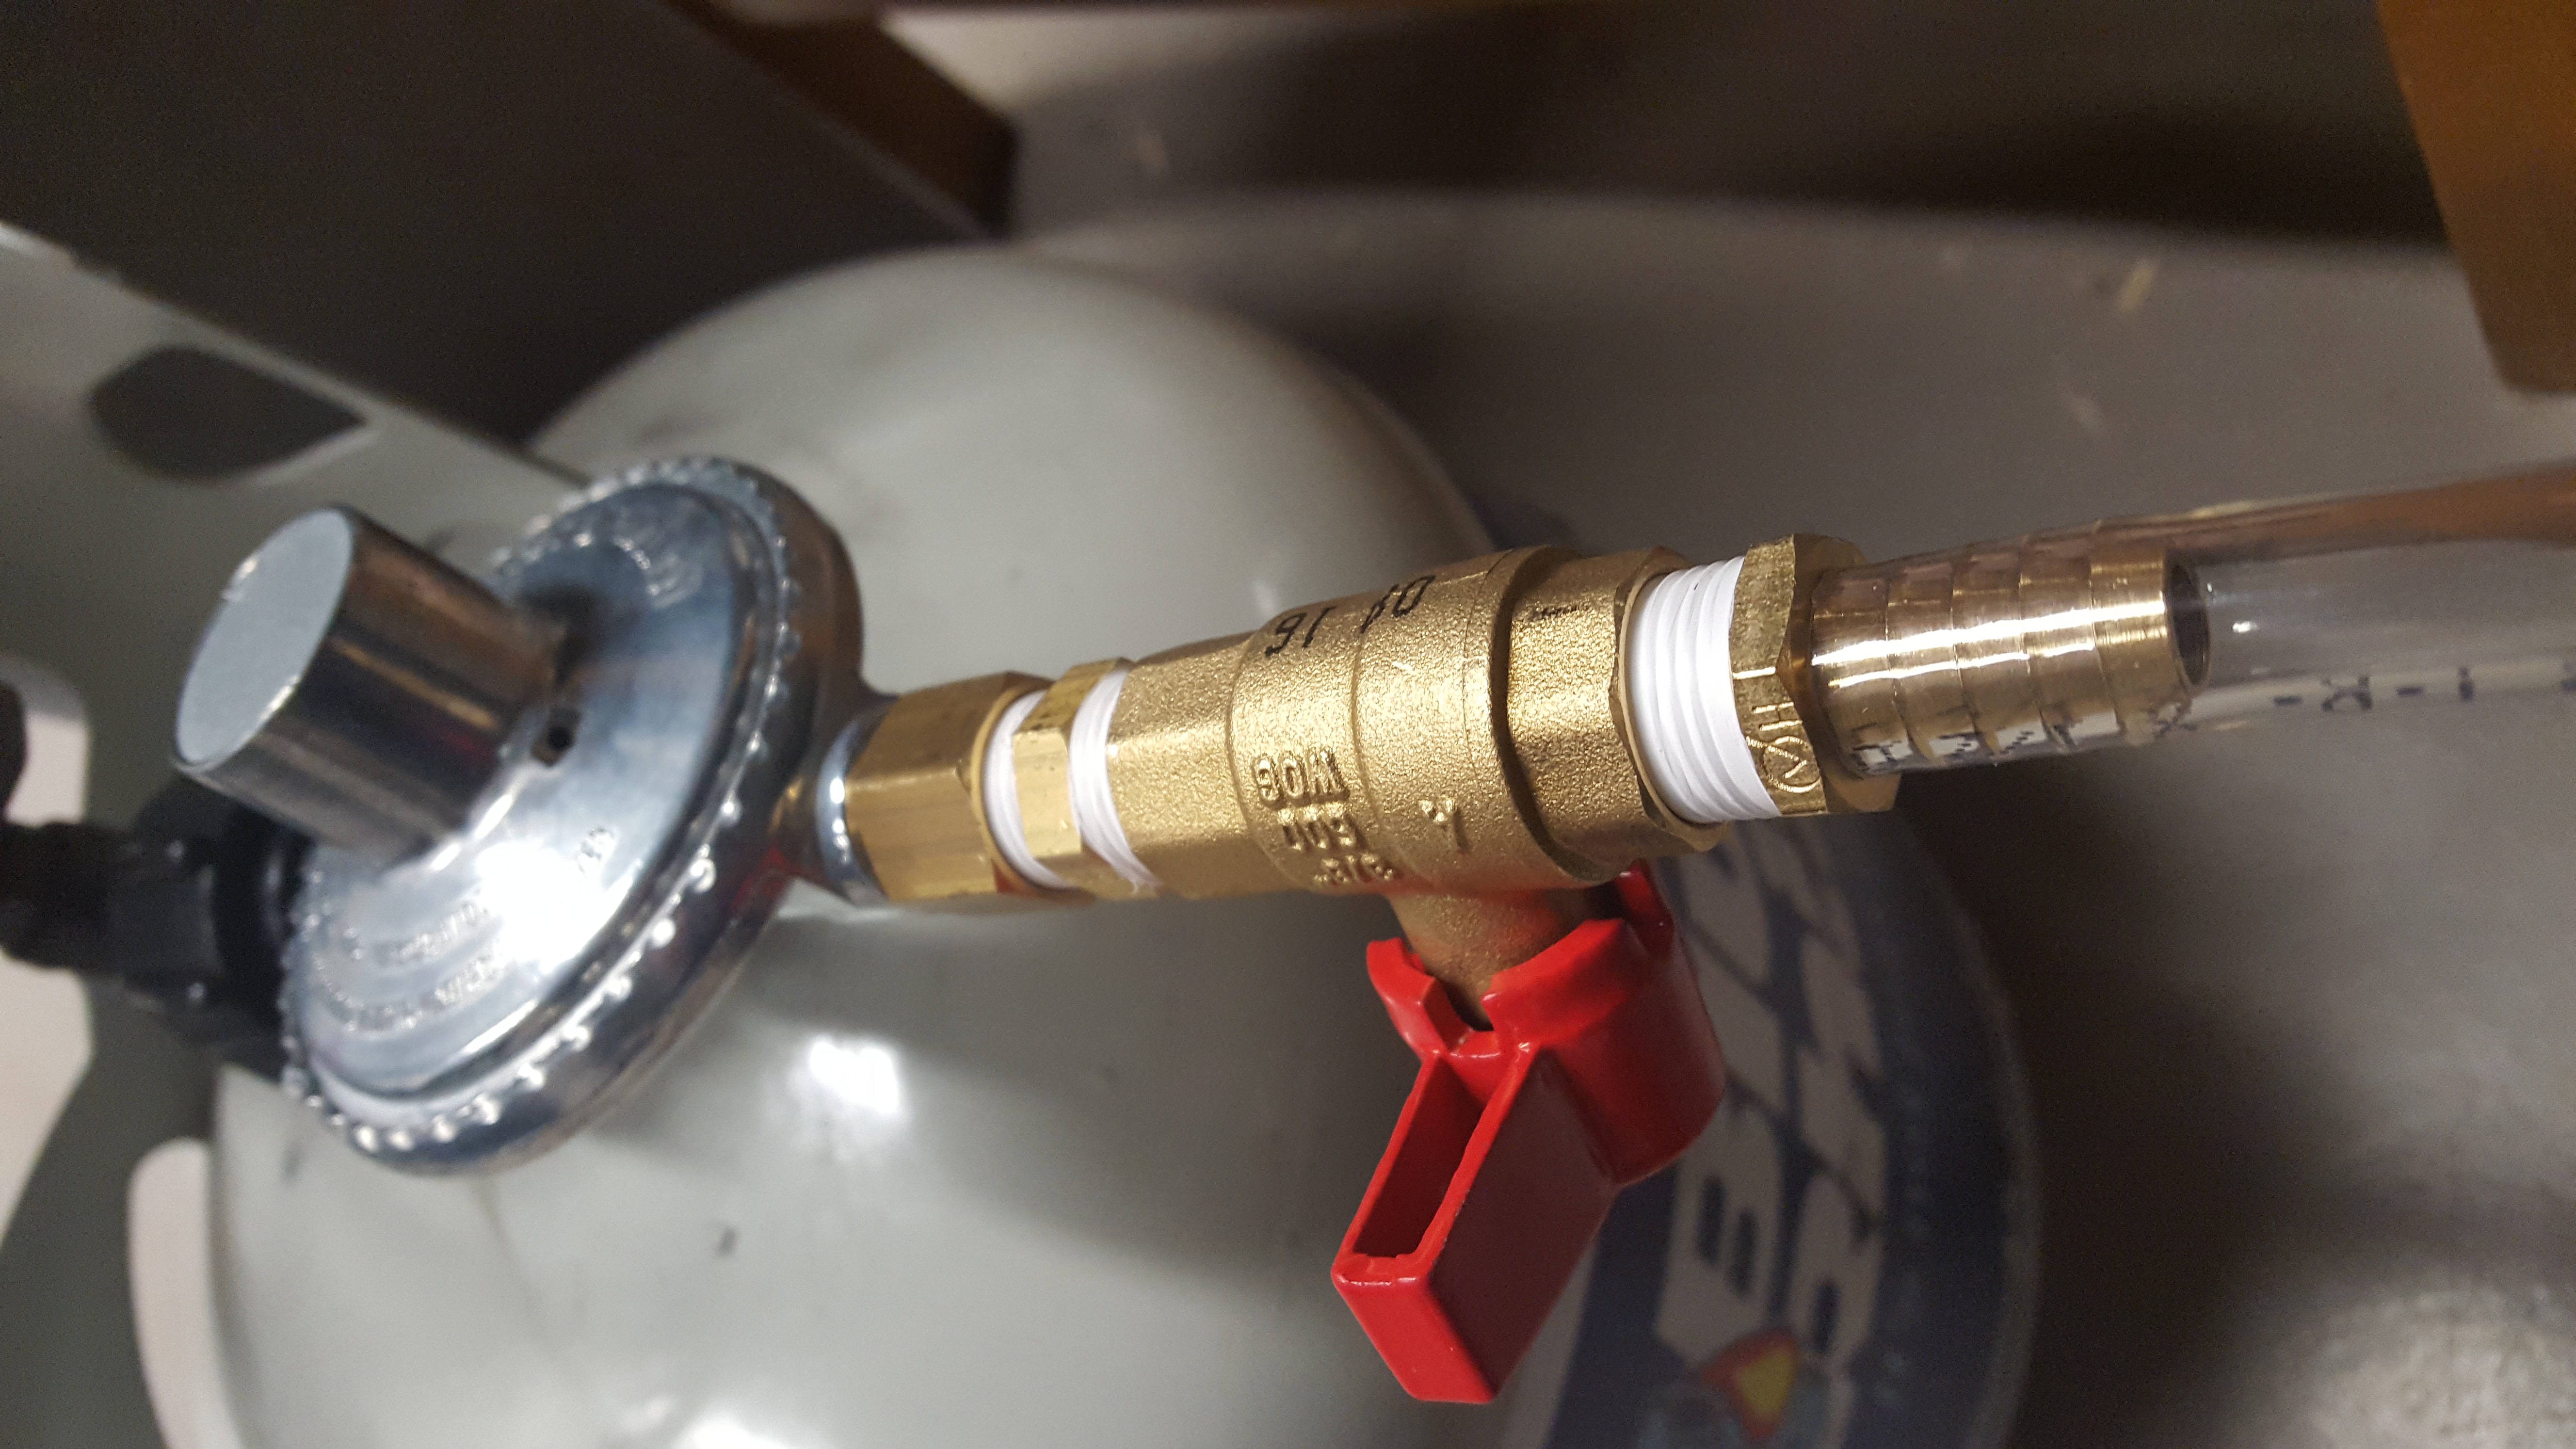
 Now that we have the thread tape on both sides of the pipe nipple, we can screw it into the regulator and the ball valve. Use two wrenches, one on the pipe nipple and one on the other part, to tighten pieces together. Now that the pipe nipple and valve connected, we need a way to connect the hose to the valve. For this, we need something called a barbed MIP adaptor. On one side is a male 3/8″ NPT thread. On the other side is a barbed hose adaptor for a 3/8″ inner diameter (ID) hose. After taping the male thread with PTFE tape, we can screw it into the valve. Here is a picture of the hex nipple and the adaptor taped up.
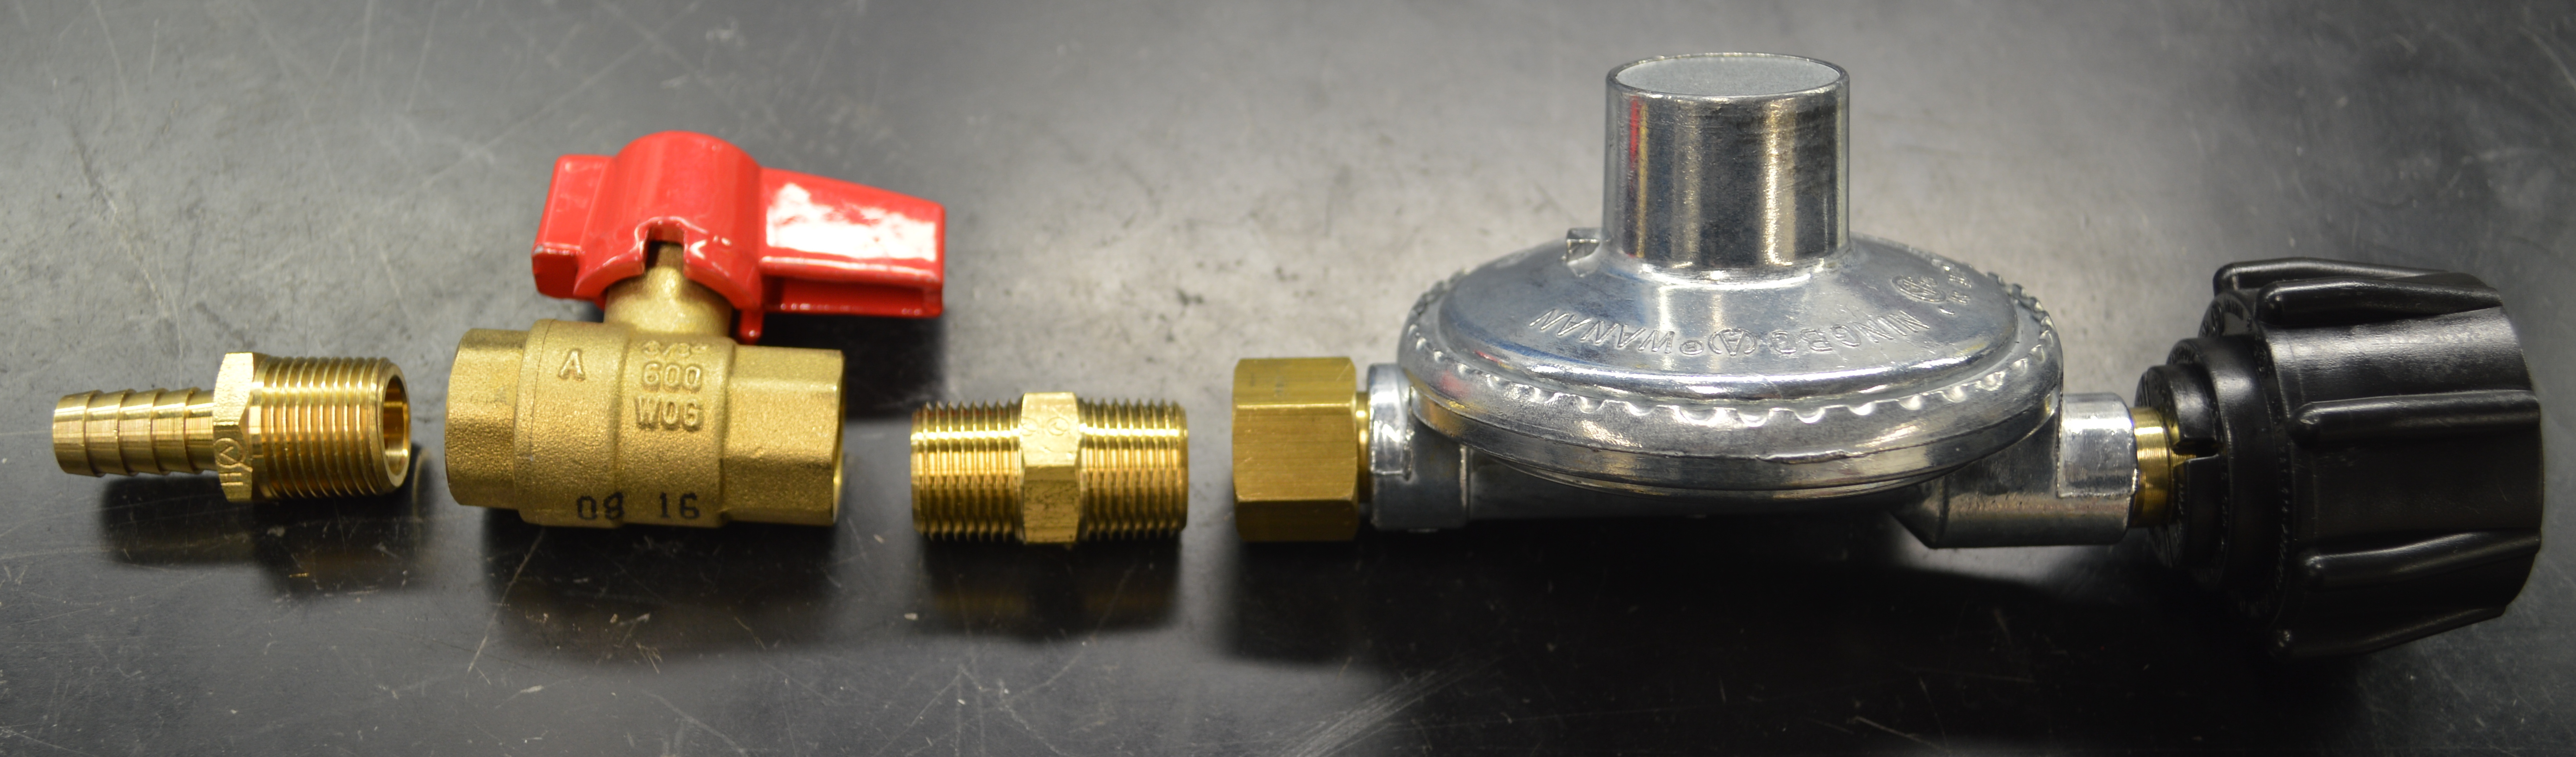
 This completes the gas side of the setup. The first picture below shows the parts laid out on the table in the places they will be assembled, and the second picture shows everything screwed together. In the first picture, the ball valve is in the ‘open’ positive, while in the second picture it’s in the ‘closed’ position. Whenever the handle is parallel with the flow direction, it’s open, and whenever it is perpendicular to the flow direction, it’s closed.

Finishing the Setup
Now that we have both sections completed, we just need to connect the two with the flexible tubing. I bought some 3/8″ ID, 1/2″ OD tubing at the store. Make sure to get enough to comfortably run from the propane tank to the tube. When you’ve cut the right amount, put the tube on both of the barbs. If you want to be super safe, you should put hose clamps on the tube and tighten them over the barbed fittings. However, with the low pressures we’re dealing with, you don’t necessarily need them. The last thing we need to do is place the speaker next to the diaphragm and the setup is complete. Before you start going nuts with your music, you should leak check the system. There are special solutions for performing leak checks, but you can just use soapy water. Make sure the ball valve is closed, and slowly open up the propane tank valve. Then open the ball valve slowly and you should hear gas flowing through the system. Put some of the water solution on on the connections. If you have a leak, you will see bubbles start to form and get larger. At that point, close the ball valve and the propane tank valve. Tighten your leaky connections, and if that doesn’t work, you’ll need to figure out what could be causing it. After you make sure your connections aren’t leaking, you’re good to go.
Running the Tube
Everything is set up and ready to go, so let’s fire it up. Here are the steps need to get it going. You’ll need your lighter at the ready. First, make sure the ball valve is closed (turned perpendicular to the length of the piping). The propane tank should have been closed up until this point. But now it is safe to open the valve on the tank. Slowly turn the knob counter-clockwise. With the ball valve closed, the gas has only flowed up to the valve, but is not flowing throughout the whole system yet. Now we can slowly open the ball valve and you’ll hear gas flowing through the tube. Because the propane is heavier than air, and the only outlets from the tube are the holes on the top, the gas will fill up the tube from the bottom until it is full, at which point it will start coming out of the holes. It fills up faster than you think, so after waiting about ten to fifteen seconds (and if you smell propane in the air), you can turn on the lighter and put it next to the holes. You’ll see some flames and some of the adjacent holes might light as well. You’ll probably need to move the lighter down along the tube to light them all. Once they’re all lit, we’re ready to turn on the speaker and see some sound!
Notes
These are just some things you might have had a question about, or might want to think about, in no particular order. I’ll add to this list as things come to mind.
- The parts that I list in the Bill of Materials section will only work if the regulator you buy has an output connector that’s a 3/8″ NPT female. The box didn’t say anything about the output size or thread, so I took it out of the box at the store and went to the fittings section to check what size it was. Mine was a 3/8″ NPT, so that’s why I went with those dimension for this setup.
- You always need to be careful when working with flammable gases and fire, but it might also be prudent to read up on something called ‘flammability limits’. If you go to the Wikipedia page for flammability limits, and scroll down to Propane entry in the table, you can see that propane will only ignite when it is between 2.2 and 10.1 percent by volume of air. That is, there is a narrow region in which the propane will stay lit. The type of flame that you see when using your tube is called a ‘diffusion flame’. In a nutshell, the propane gas comes out of the tube, and the visible flame you see is the region where the intersection of propane and air is in the right proportions.
- I switch between calling it a Rubens Tube and a Rubens’ Tube because I’ve seen it both ways. It was invented by a guy named Heinrich Rubens, so the second naming style is the possessive, calling it his tube. But I also think the first naming style is fine and makes more sense if you precede it with an article (e.g. A Rubens Tube). If John Smith invented it, I feel like it would make sense to call it a Smith Tube, instead of a Smith’s Tube.
Links and References
- https://www.youtube.com/watch?v=sQ3DCe5fziY
- http://www.engineeringtoolbox.com/npt-national-pipe-taper-threads-d_750.html
- https://en.wikipedia.org/wiki/Flammability_limit
Came here after doing some trials and constantly burning out my diaphrams. Also flame size was not very appealing, though the entire system worked and could see the musical response of flames. Reading your blog clearly showed all the mistakes/shortcomings in my setup, and now I know what to refine. Thank you so much for the beautiful detailing and the video that goes with it.
Thanks so much for the video and these instructions! I’ve wanted to make a tube since I watched a video about it in AP Physics last year, and your video made it easy. I made an instagram account (@rubens.tube) where I post videos of it in action with some of my favorite songs.
No problem! I’m glad the instructions weren’t too crazy. I took a look at a couple of your videos and it looks like it came out really great!